Entrance Tunnel - The Mines (Resident Evil 5)

Image of Entrance Tunnel - The Mines

This place is linked to the following locations:

Location Chapter 2-2   | Show on map

Contents

Chapter 2-2

  • Image of Herb (Green)

    1 Herb (Green)

    Amateur
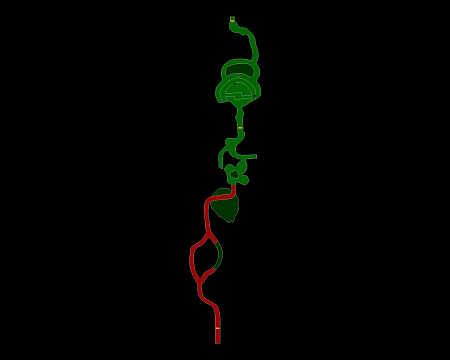
    On the ground at the southern starting point of the tunnel.

    View detail | Show on map
  • Image of Herb (Green)

    1 Herb (Green)

    Normal
    On the ground at the southern starting point of the tunnel.
    View detail | Show on map
  • Image of Herb (Green)

    1 Herb (Green)

    Veteran
    On the ground at the southern starting point of the tunnel.
    View detail | Show on map
  • Image of Herb (Green)

    1 Herb (Green)

    Professional
    On the ground at the southern starting point of the tunnel.
    View detail | Show on map
  • Image of Ruby (Pear)

    1 Ruby (Pear)

    Amateur
    In the ceiling of the tunnel near the southern starting point. This jewel is invisible, so you need to proceed along the tunnel until you come across two sandbags on the left side just before the tunnel first splits (you will pass three sandbags first). When you see the two sandbags, step back and aim upwards so your crosshair is is aimed at the middle of the roof, almost exactly in line as the sandbags and between the wooden rafters of the tunnel. Your crosshair will turn red when you're aiming at the jewel.
    View detail | Show on map
  • Image of Ruby (Pear)

    1 Ruby (Pear)

    Normal
    In the ceiling of the tunnel near the southern starting point. This jewel is invisible, so you need to proceed along the tunnel until you come across two sandbags on the left side just before the tunnel first splits (you will pass three sandbags first). When you see the two sandbags, step back and aim upwards so your crosshair is is aimed at the middle of the roof, almost exactly in line as the sandbags and between the wooden rafters of the tunnel. Your crosshair will turn red when you're aiming at the jewel.
    View detail | Show on map
  • Image of Ruby (Pear)

    1 Ruby (Pear)

    Veteran
    In the ceiling of the tunnel near the southern starting point. This jewel is invisible, so you need to proceed along the tunnel until you come across two sandbags on the left side just before the tunnel first splits (you will pass three sandbags first). When you see the two sandbags, step back and aim upwards so your crosshair is is aimed at the middle of the roof, almost exactly in line as the sandbags and between the wooden rafters of the tunnel. Your crosshair will turn red when you're aiming at the jewel.
    View detail | Show on map
  • Image of Ruby (Pear)

    1 Ruby (Pear)

    Professional
    In the ceiling of the tunnel near the southern starting point. This jewel is invisible, so you need to proceed along the tunnel until you come across two sandbags on the left side just before the tunnel first splits (you will pass three sandbags first). When you see the two sandbags, step back and aim upwards so your crosshair is is aimed at the middle of the roof, almost exactly in line as the sandbags and between the wooden rafters of the tunnel. Your crosshair will turn red when you're aiming at the jewel.
    View detail | Show on map
  • Image of Herb (Red)

    1 Herb (Red)

    Amateur
    At the end of the eastern tunnel where the tunnel splits for the first time.
    View detail | Show on map
  • Image of Herb (Red)

    1 Herb (Red)

    Normal
    At the end of the eastern tunnel where the tunnel splits for the first time.
    View detail | Show on map
  • Image of Herb (Red)

    1 Herb (Red)

    Veteran
    At the end of the eastern tunnel where the tunnel splits for the first time.
    View detail | Show on map
  • Image of Herb (Red)

    1 Herb (Red)

    Professional
    At the end of the eastern tunnel where the tunnel splits for the first time.
    View detail | Show on map
  • Image of Town Majini

    2 Town Majinis

    Amateur
    In the first partially flooded section of the tunnel.
    View detail | Show on map
  • Image of Town Majini

    2 Town Majinis

    Normal
    In the first partially flooded section of the tunnel.
    View detail | Show on map
  • Image of Town Majini

    2 Town Majinis

    Veteran
    In the first partially flooded section of the tunnel.
    View detail | Show on map
  • Image of Town Majini

    2 Town Majinis

    Professional
    In the first partially flooded section of the tunnel.
    View detail | Show on map
  • Image of Ruby (Pear)

    1 Ruby (Pear)

    Amateur
    In the ceiling of the tunnel at the end of the first partially flooded section.
    View detail | Show on map
  • Image of Ruby (Pear)

    1 Ruby (Pear)

    Normal
    In the ceiling of the tunnel at the end of the first partially flooded section.
    View detail | Show on map
  • Image of Ruby (Pear)

    1 Ruby (Pear)

    Veteran
    In the ceiling of the tunnel at the end of the first partially flooded section.
    View detail | Show on map
  • Image of Ruby (Pear)

    1 Ruby (Pear)

    Professional
    In the ceiling of the tunnel at the end of the first partially flooded section.
    View detail | Show on map
  • Image of Town Majini

    1 Town Majini

    Amateur
    At the end of the eastern tunnel where the tunnel splits for the second time.
    View detail | Show on map
  • Image of Town Majini

    1 Town Majini

    Normal
    At the end of the eastern tunnel where the tunnel splits for the second time.
    View detail | Show on map
  • Image of Town Majini

    1 Town Majini

    Veteran
    At the end of the eastern tunnel where the tunnel splits for the second time.
    View detail | Show on map
  • Image of Town Majini

    1 Town Majini

    Professional
    At the end of the eastern tunnel where the tunnel splits for the second time.
    View detail | Show on map
  • Image of Town Majini

    1 Town Majini

    Amateur
    In the tunnel just beyond where the tunnel splits for the second time in the second partially flooded section.
    View detail | Show on map
  • Image of Town Majini

    1 Town Majini

    Normal
    In the tunnel just beyond where the tunnel splits for the second time in the second partially flooded section.
    View detail | Show on map
  • Image of Town Majini

    1 Town Majini

    Veteran
    In the tunnel just beyond where the tunnel splits for the second time in the second partially flooded section.
    View detail | Show on map
  • Image of Town Majini

    1 Town Majini

    Professional
    In the tunnel just beyond where the tunnel splits for the second time in the second partially flooded section.
    View detail | Show on map
  • Image of Small Wooden Crate

    2 Small Wooden Crates

    Amateur
    At the end of the eastern tunnel where the tunnel splits for the second time.
    View detail | Show on map
  • Image of Small Wooden Crate

    2 Small Wooden Crates

    Normal
    At the end of the eastern tunnel where the tunnel splits for the second time.
    View detail | Show on map
  • Image of Small Wooden Crate

    2 Small Wooden Crates

    Veteran
    At the end of the eastern tunnel where the tunnel splits for the second time.
    View detail | Show on map
  • Image of Small Wooden Crate

    2 Small Wooden Crates

    Professional
    At the end of the eastern tunnel where the tunnel splits for the second time.
    View detail | Show on map
  • Image of Wooden Barrel

    2 Wooden Barrels

    Amateur
    At the end of the eastern tunnel where the tunnel splits for the second time.
    View detail | Show on map
  • Image of Wooden Barrel

    2 Wooden Barrels

    Normal
    At the end of the eastern tunnel where the tunnel splits for the second time.
    View detail | Show on map
  • Image of Wooden Barrel

    2 Wooden Barrels

    Veteran
    At the end of the eastern tunnel where the tunnel splits for the second time.
    View detail | Show on map
  • Image of Wooden Barrel

    2 Wooden Barrels

    Professional
    At the end of the eastern tunnel where the tunnel splits for the second time.
    View detail | Show on map
  • Image of Ruby (Pear)

    1 Ruby (Pear)

    Amateur
    On the north side of the waterfall area, above the doorway leading out of this area.
    View detail | Show on map
  • Image of Ruby (Pear)

    1 Ruby (Pear)

    Normal
    On the north side of the waterfall area, above the doorway leading out of this area.
    View detail | Show on map
  • Image of Ruby (Pear)

    1 Ruby (Pear)

    Veteran
    On the north side of the waterfall area, above the doorway leading out of this area.
    View detail | Show on map
  • Image of Ruby (Pear)

    1 Ruby (Pear)

    Professional
    On the north side of the waterfall area, above the doorway leading out of this area.
    View detail | Show on map
  • Image of BSAA Emblem

    BSAA Emblem

    Amateur
    In the waterfall area, in the distance on the southern wall.
    View detail | Show on map
  • Image of BSAA Emblem

    BSAA Emblem

    Normal
    In the waterfall area, in the distance on the southern wall.
    View detail | Show on map
  • Image of BSAA Emblem

    BSAA Emblem

    Veteran
    In the waterfall area, in the distance on the southern wall.
    View detail | Show on map
  • Image of BSAA Emblem

    BSAA Emblem

    Professional
    In the waterfall area, in the distance on the southern wall.
    View detail | Show on map

There are no contents to show for this game mode. The following game modes are applicable:

Related product

Welcome to Raccoon City Sign

Buy the Welcome to Raccoon City Sign on Amazon