Evil Resource

44 MAG Ammo (Resident Evil 7 Biohazard)

Image of 44 MAG Ammo

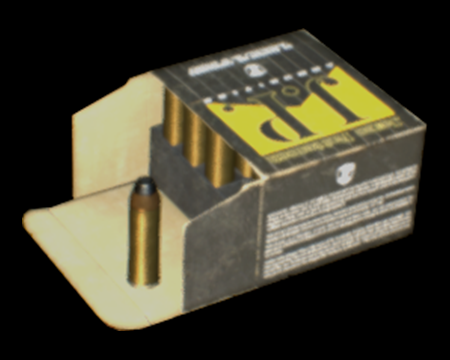
Large caliber ammo for use with the 44 MAG.

A box of magnum bullets. These rounds can be used with the 44 MAG.
CategoryWeaponry (Ammunition)

Related product

T-Virus/G-Vaccine Prop Replica Set with Case

T-Virus/G-Vaccine Prop Replica Set with Case

Buy the T-Virus/G-Vaccine Prop Replica Set with Case on Amazon

Statistics

Game modeOccurrencesSum total
Easy8 15
Normal9 16
Madhouse7 15

Location

  • Image of Trailer - Yard

    Trailer - Yard

    Easy
    44 MAG Ammo (1×3) - Inside the toilet. You need to have the relevant Treasure Photo in your possession to discover it.
    View location | Show on map
  • Image of Trailer - Yard

    Trailer - Yard

    Normal
    44 MAG Ammo (1×3) - Inside the toilet. You need to have the relevant Treasure Photo in your possession to discover it.
    View location | Show on map
  • Image of Trailer - Yard

    Trailer - Yard

    Madhouse
    44 MAG Ammo (1×3) - Inside the toilet. You need to have the relevant Treasure Photo in your possession to discover it.
    View location | Show on map
  • Image of Dilapidated Room - Old House 1F

    Dilapidated Room - Old House 1F

    Easy
    44 MAG Ammo (1×2) - Behind the breeze blocks next to the door to the Guest Room in the south east area of the room.
    View location | Show on map
  • Image of Dilapidated Room - Old House 1F

    Dilapidated Room - Old House 1F

    Normal
    44 MAG Ammo (1×2) - Behind the breeze blocks next to the door to the Guest Room in the south east area of the room.
    View location | Show on map
  • Image of Old Yard - Old House (West) 1F

    Old Yard - Old House (West) 1F

    Madhouse
    44 MAG Ammo (1×1) - On the banister next to the door leading to the Old Entrance Hall.
    View location | Show on map
  • Image of Potting Room - Old House (West) 2F

    Potting Room - Old House (West) 2F

    Madhouse
    44 MAG Ammo (1×3) - Inside the trunk on the table on the west side of the room. You need a Lock Pick to open it.
    View location | Show on map
  • Image of Supply Room - Testing Area 2F

    Supply Room - Testing Area 2F

    Easy
    44 MAG Ammo (1×2) - Underneath the metal cage near the north west door.
    View location | Show on map
  • Image of Supply Room - Testing Area 2F

    Supply Room - Testing Area 2F

    Normal
    44 MAG Ammo (1×2) - Underneath the metal cage near the north west door.
    View location | Show on map
  • Image of Wooden Corridor - Testing Area 1F

    Wooden Corridor - Testing Area 1F

    Madhouse
    44 MAG Ammo (1×1) - Behind the corrugated metal sheet in the south east corner of the corridor.
    View location | Show on map
  • Image of Barn - Testing Area 1F

    Barn - Testing Area 1F

    Easy
    44 MAG Ammo (1×2) - On the ground amongst the hay bales in the south east corner of the western half of the room.
    View location | Show on map
  • Image of Barn - Testing Area 1F

    Barn - Testing Area 1F

    Normal
    44 MAG Ammo (1×2) - On the ground amongst the hay bales in the south east corner of the western half of the room.
    View location | Show on map
  • Image of Walkway - Boat House 1F

    Walkway - Boat House 1F

    Easy
    44 MAG Ammo (1×1) - On the ground next to the fishing cages on the platform containing the second crank mechanism.
    View location | Show on map
  • Image of Walkway - Boat House 1F

    Walkway - Boat House 1F

    Normal
    44 MAG Ammo (1×1) - On the ground next to the fishing cages on the platform containing the second crank mechanism.
    View location | Show on map
  • Image of Walkway - Boat House 1F

    Walkway - Boat House 1F

    Madhouse
    44 MAG Ammo (1×1) - On the ground next to the post near the door to the Shed 1F.
    View location | Show on map
  • Image of Mine Entrance Path - Swamp

    Mine Entrance Path - Swamp

    Normal
    44 MAG Ammo (1×1) - On a ledge of the wall of the Mine Office in the north east corner.
    View location | Show on map
  • Image of Crossroads - Salt Mine B3

    Crossroads - Salt Mine B3

    Easy
    44 MAG Ammo (1×1) - Inside the partially-buried barrel in the eastern section of the tunnel.
    View location | Show on map
  • Image of Crossroads - Salt Mine B3

    Crossroads - Salt Mine B3

    Normal
    44 MAG Ammo (1×1) - Inside the partially-buried barrel in the eastern section of the tunnel.
    View location | Show on map
  • Image of Cultivation Room - Salt Mine B3

    Cultivation Room - Salt Mine B3

    Madhouse
    44 MAG Ammo (1×4) - Inside the locked toolbox on one of the bathtubs. You need a Lock Pick to open it.
    View location | Show on map
  • Image of South Cavern - Salt Mine B3

    South Cavern - Salt Mine B3

    Easy
    44 MAG Ammo (1×2) - Behind the curtain at the end of the upper walkway on the north side of the cavern.
    View location | Show on map
  • Image of South Cavern - Salt Mine B3

    South Cavern - Salt Mine B3

    Normal
    44 MAG Ammo (1×2) - Behind the curtain at the end of the upper walkway on the north side of the cavern.
    View location | Show on map
  • Image of Flooded Cavern - Salt Mine B3

    Flooded Cavern - Salt Mine B3

    Easy
    44 MAG Ammo (1×2) - On a rock in the north west area of the cavern.
    View location | Show on map
  • Image of Flooded Cavern - Salt Mine B3

    Flooded Cavern - Salt Mine B3

    Normal
    44 MAG Ammo (1×2) - On a rock in the north west area of the cavern.
    View location | Show on map
  • Image of Spiralling Cavern - Salt Mine B1

    Spiralling Cavern - Salt Mine B1

    Madhouse
    44 MAG Ammo (1×2) - In the small offshoot passage in the south west area of the B2 level.
    View location | Show on map

There are no locations to show for this game mode. The following game modes are applicable:

Related product

Resident Evil Nemesis Statue

Resident Evil Nemesis Statue

Buy the Resident Evil Nemesis 12-inch Statue on Amazon

Explore further