Evil Resource

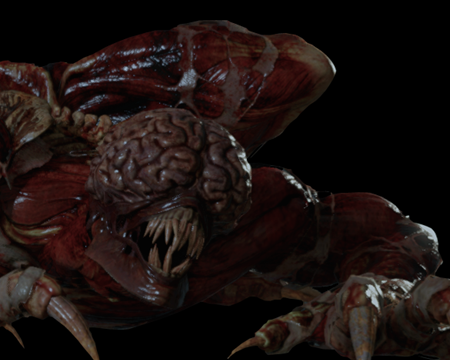
Licker (Resident Evil 2 Remake)

Image of Licker
These aggressive creatures are the result of bio-weapon research conducted using the T-Virus. They are capable of climbing on walls and ceilings using their immensely large and powerful claws. Their weakness is their inability to see, however their hearing has developed to be incredibly sensitive.
CategoryEnemy
Other appearances

Related product

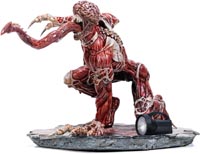
Numskull Resident Evil Licker Collectible Replica Statue

Numskull Resident Evil Licker Collectible Replica Statue

Buy the Numskull Resident Evil Licker Figure 6.5" 16cm Collectible Replica Statue on Amazon

Statistics

Game modeSum total
Leon (Standard)6
Claire (Standard)11
Leon [2nd] (Standard)8
Claire [2nd] (Standard)12
Leon (Hardcore)6
Claire (Hardcore)11
Leon [2nd] (Hardcore)8
Claire [2nd] (Hardcore)12

Location

  • Image of West Hallway 2F - Police Station 2F

    West Hallway 2F - Police Station 2F

    Leon (Standard)
    1 Licker - On the ceiling.
    View location | Show on map
  • Image of West Hallway 2F - Police Station 2F

    West Hallway 2F - Police Station 2F

    Claire (Standard)
    1 Licker - On the ceiling.
    View location | Show on map
  • Image of West Hallway 2F - Police Station 2F

    West Hallway 2F - Police Station 2F

    Leon (Hardcore)
    1 Licker - On the ceiling.
    View location | Show on map
  • Image of West Hallway 2F - Police Station 2F

    West Hallway 2F - Police Station 2F

    Claire (Hardcore)
    1 Licker - On the ceiling.
    View location | Show on map
  • Image of South West Hallway - Police Station 1F

    South West Hallway - Police Station 1F

    Leon [2nd] (Standard)
    1 Licker - On the ceiling.
    View location | Show on map
  • Image of South West Hallway - Police Station 1F

    South West Hallway - Police Station 1F

    Claire [2nd] (Standard)
    1 Licker - On the ceiling.
    View location | Show on map
  • Image of South West Hallway - Police Station 1F

    South West Hallway - Police Station 1F

    Leon [2nd] (Hardcore)
    1 Licker - On the ceiling.
    View location | Show on map
  • Image of South West Hallway - Police Station 1F

    South West Hallway - Police Station 1F

    Claire [2nd] (Hardcore)
    1 Licker - On the ceiling.
    View location | Show on map
  • Image of Art Room - Police Station 2F

    Art Room - Police Station 2F

    Leon [2nd] (Standard)
    1 Licker - Drops through the glass ceiling as soon as you solve the puzzle with the statue.
    View location | Show on map
  • Image of Art Room - Police Station 2F

    Art Room - Police Station 2F

    Claire [2nd] (Standard)
    1 Licker - Drops through the glass ceiling as soon as you solve the puzzle with the statue.
    View location | Show on map
  • Image of Art Room - Police Station 2F

    Art Room - Police Station 2F

    Leon [2nd] (Hardcore)
    1 Licker - Drops through the glass ceiling as soon as you solve the puzzle with the statue.
    View location | Show on map
  • Image of Art Room - Police Station 2F

    Art Room - Police Station 2F

    Claire [2nd] (Hardcore)
    1 Licker - Drops through the glass ceiling as soon as you solve the puzzle with the statue.
    View location | Show on map
  • Image of West Storage Room - Police Station 3F

    West Storage Room - Police Station 3F

    Leon [2nd] (Standard)
    1 Licker - Appears here after exploring the Police Station B1.
    View location | Show on map
  • Image of West Storage Room - Police Station 3F

    West Storage Room - Police Station 3F

    Claire [2nd] (Standard)
    1 Licker - Appears here after exploring the Police Station B1.
    View location | Show on map
  • Image of West Storage Room - Police Station 3F

    West Storage Room - Police Station 3F

    Leon [2nd] (Hardcore)
    1 Licker - Appears here after exploring the Police Station B1.
    View location | Show on map
  • Image of West Storage Room - Police Station 3F

    West Storage Room - Police Station 3F

    Claire [2nd] (Hardcore)
    1 Licker - Appears here after exploring the Police Station B1.
    View location | Show on map
  • Image of West Central Passage - Police Station 1F

    West Central Passage - Police Station 1F

    Leon [2nd] (Standard)
    1 Licker - Appears here after exploring the Sewers.
    1 Licker - Appears here after exploring the Police Station B1.
    View location | Show on map
  • Image of West Central Passage - Police Station 1F

    West Central Passage - Police Station 1F

    Leon [2nd] (Hardcore)
    1 Licker - Appears here after exploring the Sewers.
    1 Licker - Appears here after exploring the Police Station B1.
    View location | Show on map
  • Image of West Storage Room - Police Station 3F

    West Storage Room - Police Station 3F

    Leon (Standard)
    1 Licker - Enters the room after using the Detonator to destroy the blocked doorway in the southern side of the room.
    View location | Show on map
  • Image of West Storage Room - Police Station 3F

    West Storage Room - Police Station 3F

    Claire (Standard)
    1 Licker - Enters the room after using the Detonator to destroy the blocked doorway in the southern side of the room.
    View location | Show on map
  • Image of West Storage Room - Police Station 3F

    West Storage Room - Police Station 3F

    Leon (Hardcore)
    1 Licker - Enters the room after using the Detonator to destroy the blocked doorway in the southern side of the room.
    View location | Show on map
  • Image of West Storage Room - Police Station 3F

    West Storage Room - Police Station 3F

    Claire (Hardcore)
    1 Licker - Enters the room after using the Detonator to destroy the blocked doorway in the southern side of the room.
    View location | Show on map
  • Image of Kennel - Police Station B1

    Kennel - Police Station B1

    Claire (Standard)
    2 Lickers - One is eating one of the dogs when you first enter, the other is on the east side of the room.
    View location | Show on map
  • Image of Kennel - Police Station B1

    Kennel - Police Station B1

    Claire [2nd] (Standard)
    2 Lickers - One is eating one of the dogs when you first enter, the other is on the east side of the room.
    View location | Show on map
  • Image of Kennel - Police Station B1

    Kennel - Police Station B1

    Claire (Hardcore)
    2 Lickers - One is eating one of the dogs when you first enter, the other is on the east side of the room.
    View location | Show on map
  • Image of Kennel - Police Station B1

    Kennel - Police Station B1

    Claire [2nd] (Hardcore)
    2 Lickers - One is eating one of the dogs when you first enter, the other is on the east side of the room.
    View location | Show on map
  • Image of East Central Passage B1 - Police Station B1

    East Central Passage B1 - Police Station B1

    Claire (Standard)
    1 Licker - On the wall in the south west area of the passage. If you don't attract its attention or kill it, it will crawl out of sight and will disappear.
    1 Licker - On the ceiling in the south west area of the passage after acquiring the Diamond Key.
    View location | Show on map
  • Image of East Central Passage B1 - Police Station B1

    East Central Passage B1 - Police Station B1

    Claire [2nd] (Standard)
    1 Licker - On the wall in the south west area of the passage. If you don't attract its attention or kill it, it will crawl out of sight and will disappear.
    1 Licker - On the ceiling in the south west area of the passage after acquiring the Diamond Key.
    View location | Show on map
  • Image of East Central Passage B1 - Police Station B1

    East Central Passage B1 - Police Station B1

    Claire (Hardcore)
    1 Licker - On the wall in the south west area of the passage. If you don't attract its attention or kill it, it will crawl out of sight and will disappear.
    1 Licker - On the ceiling in the south west area of the passage after acquiring the Diamond Key.
    View location | Show on map
  • Image of East Central Passage B1 - Police Station B1

    East Central Passage B1 - Police Station B1

    Claire [2nd] (Hardcore)
    1 Licker - On the wall in the south west area of the passage. If you don't attract its attention or kill it, it will crawl out of sight and will disappear.
    1 Licker - On the ceiling in the south west area of the passage after acquiring the Diamond Key.
    View location | Show on map
  • Image of West Central Passage - Police Station 1F

    West Central Passage - Police Station 1F

    Leon (Standard)
    1 Licker - Appears here after exploring the Police Station B1.
    View location | Show on map
  • Image of West Central Passage - Police Station 1F

    West Central Passage - Police Station 1F

    Claire (Standard)
    1 Licker - Appears here after exploring the Police Station B1.
    View location | Show on map
  • Image of West Central Passage - Police Station 1F

    West Central Passage - Police Station 1F

    Claire [2nd] (Standard)
    1 Licker - Appears here after exploring the Police Station B1.
    View location | Show on map
  • Image of West Central Passage - Police Station 1F

    West Central Passage - Police Station 1F

    Leon (Hardcore)
    1 Licker - Appears here after exploring the Police Station B1.
    View location | Show on map
  • Image of West Central Passage - Police Station 1F

    West Central Passage - Police Station 1F

    Claire (Hardcore)
    1 Licker - Appears here after exploring the Police Station B1.
    View location | Show on map
  • Image of West Central Passage - Police Station 1F

    West Central Passage - Police Station 1F

    Claire [2nd] (Hardcore)
    1 Licker - Appears here after exploring the Police Station B1.
    View location | Show on map
  • Image of Interrogation Room - Police Station 1F

    Interrogation Room - Police Station 1F

    Claire (Standard)
    1 Licker - Bursts through the one-way mirror after exploring the west side of the room.
    View location | Show on map
  • Image of Interrogation Room - Police Station 1F

    Interrogation Room - Police Station 1F

    Claire [2nd] (Standard)
    1 Licker - Bursts through the one-way mirror after exploring the west side of the room.
    View location | Show on map
  • Image of Interrogation Room - Police Station 1F

    Interrogation Room - Police Station 1F

    Claire (Hardcore)
    1 Licker - Bursts through the one-way mirror after exploring the west side of the room.
    View location | Show on map
  • Image of Interrogation Room - Police Station 1F

    Interrogation Room - Police Station 1F

    Claire [2nd] (Hardcore)
    1 Licker - Bursts through the one-way mirror after exploring the west side of the room.
    View location | Show on map
  • Image of South West Hallway - Police Station 1F

    South West Hallway - Police Station 1F

    Leon (Standard)
    1 Licker - Appears here after exploring the Police Station B1.
    View location | Show on map
  • Image of South West Hallway - Police Station 1F

    South West Hallway - Police Station 1F

    Claire (Standard)
    1 Licker - Appears here after exploring the Police Station B1.
    View location | Show on map
  • Image of South West Hallway - Police Station 1F

    South West Hallway - Police Station 1F

    Leon [2nd] (Standard)
    1 Licker - Appears here after exploring the Police Station B1.
    View location | Show on map
  • Image of South West Hallway - Police Station 1F

    South West Hallway - Police Station 1F

    Claire [2nd] (Standard)
    1 Licker - Appears here after exploring the Police Station B1.
    View location | Show on map
  • Image of South West Hallway - Police Station 1F

    South West Hallway - Police Station 1F

    Leon (Hardcore)
    1 Licker - Appears here after exploring the Police Station B1.
    View location | Show on map
  • Image of South West Hallway - Police Station 1F

    South West Hallway - Police Station 1F

    Claire (Hardcore)
    1 Licker - Appears here after exploring the Police Station B1.
    View location | Show on map
  • Image of South West Hallway - Police Station 1F

    South West Hallway - Police Station 1F

    Leon [2nd] (Hardcore)
    1 Licker - Appears here after exploring the Police Station B1.
    View location | Show on map
  • Image of South West Hallway - Police Station 1F

    South West Hallway - Police Station 1F

    Claire [2nd] (Hardcore)
    1 Licker - Appears here after exploring the Police Station B1.
    View location | Show on map
  • Image of Lounge - Laboratory B2 (East)

    Lounge - Laboratory B2 (East)

    Leon (Standard)
    2 Lickers - Burst into the room as you approach the end of the western corridor section of the room.
    View location | Show on map
  • Image of Lounge - Laboratory B2 (East)

    Lounge - Laboratory B2 (East)

    Claire (Standard)
    2 Lickers - Burst into the room as you approach the end of the western corridor section of the room.
    View location | Show on map
  • Image of Lounge - Laboratory B2 (East)

    Lounge - Laboratory B2 (East)

    Leon [2nd] (Standard)
    2 Lickers - Burst into the room as you approach the end of the western corridor section of the room.
    View location | Show on map
  • Image of Lounge - Laboratory B2 (East)

    Lounge - Laboratory B2 (East)

    Claire [2nd] (Standard)
    2 Lickers - Burst into the room as you approach the end of the western corridor section of the room.
    View location | Show on map
  • Image of Lounge - Laboratory B2 (East)

    Lounge - Laboratory B2 (East)

    Leon (Hardcore)
    2 Lickers - Burst into the room as you approach the end of the western corridor section of the room.
    View location | Show on map
  • Image of Lounge - Laboratory B2 (East)

    Lounge - Laboratory B2 (East)

    Claire (Hardcore)
    2 Lickers - Burst into the room as you approach the end of the western corridor section of the room.
    View location | Show on map
  • Image of Lounge - Laboratory B2 (East)

    Lounge - Laboratory B2 (East)

    Leon [2nd] (Hardcore)
    2 Lickers - Burst into the room as you approach the end of the western corridor section of the room.
    View location | Show on map
  • Image of Lounge - Laboratory B2 (East)

    Lounge - Laboratory B2 (East)

    Claire [2nd] (Hardcore)
    2 Lickers - Burst into the room as you approach the end of the western corridor section of the room.
    View location | Show on map

Related product

Resident Evil Book 3 - City of the Dead

Resident Evil Book 3 - City of the Dead

Buy the Resident Evil Book 3 - City of the Dead by S.D. Perry on Amazon

Explore further