Evil Resource

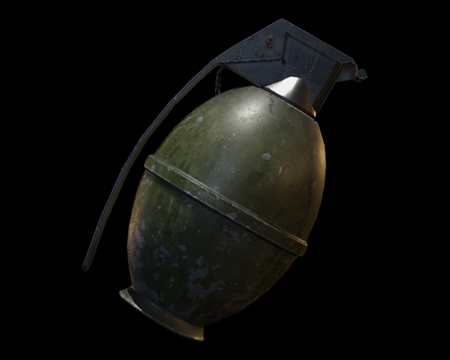
Hand Grenade (Resident Evil 2 Remake)

Image of Hand Grenade

A hand grenade that disperses lethal metal fragments and destroys its surroundings on detonation.

CategoryWeaponry (Sub-weapon)

Related product

Resident Evil Book 3 - City of the Dead

Resident Evil Book 3 - City of the Dead

Buy the Resident Evil Book 3 - City of the Dead by S.D. Perry on Amazon

Statistics

Game modeSum total
Leon (Standard)10
Claire (Standard)9
Leon [2nd] (Standard)11
Claire [2nd] (Standard)10
Leon (Hardcore)10
Claire (Hardcore)9
Leon [2nd] (Hardcore)11
Claire [2nd] (Hardcore)10

Location

  • Image of Guardroom - Police Station B1

    Guardroom - Police Station B1

    Leon [2nd] (Standard)
    On the radiator next to the door.
    View location | Show on map
  • Image of Guardroom - Police Station B1

    Guardroom - Police Station B1

    Claire [2nd] (Standard)
    On the radiator next to the door.
    View location | Show on map
  • Image of Guardroom - Police Station B1

    Guardroom - Police Station B1

    Leon [2nd] (Hardcore)
    On the radiator next to the door.
    View location | Show on map
  • Image of Guardroom - Police Station B1

    Guardroom - Police Station B1

    Claire [2nd] (Hardcore)
    On the radiator next to the door.
    View location | Show on map
  • Image of Underground Stairs 1F - Underground Facility Lower

    Underground Stairs 1F - Underground Facility Lower

    Leon (Standard)
    On the ground next to the pillar closest to the stairs.
    View location | Show on map
  • Image of Underground Stairs 1F - Underground Facility Lower

    Underground Stairs 1F - Underground Facility Lower

    Claire (Standard)
    On the ground next to the pillar closest to the stairs.
    View location | Show on map
  • Image of Underground Stairs 1F - Underground Facility Lower

    Underground Stairs 1F - Underground Facility Lower

    Leon [2nd] (Standard)
    On the ground next to the pillar closest to the stairs.
    View location | Show on map
  • Image of Underground Stairs 1F - Underground Facility Lower

    Underground Stairs 1F - Underground Facility Lower

    Claire [2nd] (Standard)
    On the ground next to the pillar closest to the stairs.
    View location | Show on map
  • Image of Underground Stairs 1F - Underground Facility Lower

    Underground Stairs 1F - Underground Facility Lower

    Leon (Hardcore)
    On the ground next to the pillar closest to the stairs.
    View location | Show on map
  • Image of Underground Stairs 1F - Underground Facility Lower

    Underground Stairs 1F - Underground Facility Lower

    Claire (Hardcore)
    On the ground next to the pillar closest to the stairs.
    View location | Show on map
  • Image of Underground Stairs 1F - Underground Facility Lower

    Underground Stairs 1F - Underground Facility Lower

    Leon [2nd] (Hardcore)
    On the ground next to the pillar closest to the stairs.
    View location | Show on map
  • Image of Underground Stairs 1F - Underground Facility Lower

    Underground Stairs 1F - Underground Facility Lower

    Claire [2nd] (Hardcore)
    On the ground next to the pillar closest to the stairs.
    View location | Show on map
  • Image of Machinery Room - Underground Facility Lower

    Machinery Room - Underground Facility Lower

    Leon (Standard)
    On the machinery in the north west section of the room.
    View location | Show on map
  • Image of Machinery Room - Underground Facility Lower

    Machinery Room - Underground Facility Lower

    Claire (Standard)
    On the machinery in the north west section of the room.
    View location | Show on map
  • Image of Machinery Room - Underground Facility Lower

    Machinery Room - Underground Facility Lower

    Leon [2nd] (Standard)
    On the machinery in the north west section of the room.
    View location | Show on map
  • Image of Machinery Room - Underground Facility Lower

    Machinery Room - Underground Facility Lower

    Claire [2nd] (Standard)
    On the machinery in the north west section of the room.
    View location | Show on map
  • Image of Machinery Room - Underground Facility Lower

    Machinery Room - Underground Facility Lower

    Leon (Hardcore)
    On the machinery in the north west section of the room.
    View location | Show on map
  • Image of Machinery Room - Underground Facility Lower

    Machinery Room - Underground Facility Lower

    Claire (Hardcore)
    On the machinery in the north west section of the room.
    View location | Show on map
  • Image of Machinery Room - Underground Facility Lower

    Machinery Room - Underground Facility Lower

    Leon [2nd] (Hardcore)
    On the machinery in the north west section of the room.
    View location | Show on map
  • Image of Machinery Room - Underground Facility Lower

    Machinery Room - Underground Facility Lower

    Claire [2nd] (Hardcore)
    On the machinery in the north west section of the room.
    View location | Show on map
  • Image of Records Room - Police Station 1F

    Records Room - Police Station 1F

    Leon (Standard)
    On the white table next to the north east door.
    View location | Show on map
  • Image of Records Room - Police Station 1F

    Records Room - Police Station 1F

    Claire (Standard)
    On the white table next to the north east door.
    View location | Show on map
  • Image of Records Room - Police Station 1F

    Records Room - Police Station 1F

    Leon [2nd] (Standard)
    On the white table next to the north east door.
    View location | Show on map
  • Image of Records Room - Police Station 1F

    Records Room - Police Station 1F

    Claire [2nd] (Standard)
    On the white table next to the north east door.
    View location | Show on map
  • Image of Records Room - Police Station 1F

    Records Room - Police Station 1F

    Leon (Hardcore)
    On the white table next to the north east door.
    View location | Show on map
  • Image of Records Room - Police Station 1F

    Records Room - Police Station 1F

    Claire (Hardcore)
    On the white table next to the north east door.
    View location | Show on map
  • Image of Records Room - Police Station 1F

    Records Room - Police Station 1F

    Leon [2nd] (Hardcore)
    On the white table next to the north east door.
    View location | Show on map
  • Image of Records Room - Police Station 1F

    Records Room - Police Station 1F

    Claire [2nd] (Hardcore)
    On the white table next to the north east door.
    View location | Show on map
  • Image of Gun Shop - Behind R.P.D.

    Gun Shop - Behind R.P.D.

    Leon (Standard)
    On the shelves on the west wall of the room.
    View location | Show on map
  • Image of Gun Shop - Behind R.P.D.

    Gun Shop - Behind R.P.D.

    Leon [2nd] (Standard)
    On the shelves on the west wall of the room.
    View location | Show on map
  • Image of Gun Shop - Behind R.P.D.

    Gun Shop - Behind R.P.D.

    Leon (Hardcore)
    On the shelves on the west wall of the room.
    View location | Show on map
  • Image of Gun Shop - Behind R.P.D.

    Gun Shop - Behind R.P.D.

    Leon [2nd] (Hardcore)
    On the shelves on the west wall of the room.
    View location | Show on map
  • Image of Outside Area North - Behind R.P.D.

    Outside Area North - Behind R.P.D.

    Claire (Standard)
    On one of the seats of the crashed bus.
    View location | Show on map
  • Image of Outside Area North - Behind R.P.D.

    Outside Area North - Behind R.P.D.

    Claire [2nd] (Standard)
    On one of the seats of the crashed bus.
    View location | Show on map
  • Image of Outside Area North - Behind R.P.D.

    Outside Area North - Behind R.P.D.

    Claire (Hardcore)
    On one of the seats of the crashed bus.
    View location | Show on map
  • Image of Outside Area North - Behind R.P.D.

    Outside Area North - Behind R.P.D.

    Claire [2nd] (Hardcore)
    On one of the seats of the crashed bus.
    View location | Show on map
  • Image of Dumping Area - Sewer Entrance

    Dumping Area - Sewer Entrance

    Leon (Standard)
    On the piles of trash.
    View location | Show on map
  • Image of Dumping Area - Sewer Entrance

    Dumping Area - Sewer Entrance

    Leon [2nd] (Standard)
    On the piles of trash.
    View location | Show on map
  • Image of Dumping Area - Sewer Entrance

    Dumping Area - Sewer Entrance

    Leon (Hardcore)
    On the piles of trash.
    View location | Show on map
  • Image of Dumping Area - Sewer Entrance

    Dumping Area - Sewer Entrance

    Leon [2nd] (Hardcore)
    On the piles of trash.
    View location | Show on map
  • Image of Central Hub - Sewers Lower

    Central Hub - Sewers Lower

    Leon (Standard)
    On the ledge in the north west area of the waterway.
    View location | Show on map
  • Image of Central Hub - Sewers Lower

    Central Hub - Sewers Lower

    Claire (Standard)
    On the ledge in the north west area of the waterway.
    View location | Show on map
  • Image of Central Hub - Sewers Lower

    Central Hub - Sewers Lower

    Leon [2nd] (Standard)
    On the ledge in the north west area of the waterway.
    View location | Show on map
  • Image of Central Hub - Sewers Lower

    Central Hub - Sewers Lower

    Claire [2nd] (Standard)
    On the ledge in the north west area of the waterway.
    View location | Show on map
  • Image of Central Hub - Sewers Lower

    Central Hub - Sewers Lower

    Leon (Hardcore)
    On the ledge in the north west area of the waterway.
    View location | Show on map
  • Image of Central Hub - Sewers Lower

    Central Hub - Sewers Lower

    Claire (Hardcore)
    On the ledge in the north west area of the waterway.
    View location | Show on map
  • Image of Central Hub - Sewers Lower

    Central Hub - Sewers Lower

    Leon [2nd] (Hardcore)
    On the ledge in the north west area of the waterway.
    View location | Show on map
  • Image of Central Hub - Sewers Lower

    Central Hub - Sewers Lower

    Claire [2nd] (Hardcore)
    On the ledge in the north west area of the waterway.
    View location | Show on map
  • Image of Cafeteria - Laboratory B1

    Cafeteria - Laboratory B1

    Leon (Standard)
    On the dead body in the south east corner of the room.
    View location | Show on map
  • Image of Cafeteria - Laboratory B1

    Cafeteria - Laboratory B1

    Claire (Standard)
    On the dead body in the south east corner of the room.
    View location | Show on map
  • Image of Cafeteria - Laboratory B1

    Cafeteria - Laboratory B1

    Leon [2nd] (Standard)
    On the dead body in the south east corner of the room.
    View location | Show on map
  • Image of Cafeteria - Laboratory B1

    Cafeteria - Laboratory B1

    Claire [2nd] (Standard)
    On the dead body in the south east corner of the room.
    View location | Show on map
  • Image of Cafeteria - Laboratory B1

    Cafeteria - Laboratory B1

    Leon (Hardcore)
    On the dead body in the south east corner of the room.
    View location | Show on map
  • Image of Cafeteria - Laboratory B1

    Cafeteria - Laboratory B1

    Claire (Hardcore)
    On the dead body in the south east corner of the room.
    View location | Show on map
  • Image of Cafeteria - Laboratory B1

    Cafeteria - Laboratory B1

    Leon [2nd] (Hardcore)
    On the dead body in the south east corner of the room.
    View location | Show on map
  • Image of Cafeteria - Laboratory B1

    Cafeteria - Laboratory B1

    Claire [2nd] (Hardcore)
    On the dead body in the south east corner of the room.
    View location | Show on map
  • Image of Drug Testing Lab - Laboratory B1

    Drug Testing Lab - Laboratory B1

    Leon (Standard)
    On the floor next to the dead body in the protective suit in the north west corner of the room.
    View location | Show on map
  • Image of Drug Testing Lab - Laboratory B1

    Drug Testing Lab - Laboratory B1

    Claire (Standard)
    On the floor next to the dead body in the protective suit in the north west corner of the room.
    View location | Show on map
  • Image of Drug Testing Lab - Laboratory B1

    Drug Testing Lab - Laboratory B1

    Leon [2nd] (Standard)
    On the floor next to the dead body in the protective suit in the north west corner of the room.
    View location | Show on map
  • Image of Drug Testing Lab - Laboratory B1

    Drug Testing Lab - Laboratory B1

    Claire [2nd] (Standard)
    On the floor next to the dead body in the protective suit in the north west corner of the room.
    View location | Show on map
  • Image of Drug Testing Lab - Laboratory B1

    Drug Testing Lab - Laboratory B1

    Leon (Hardcore)
    On the floor next to the dead body in the protective suit in the north west corner of the room.
    View location | Show on map
  • Image of Drug Testing Lab - Laboratory B1

    Drug Testing Lab - Laboratory B1

    Claire (Hardcore)
    On the floor next to the dead body in the protective suit in the north west corner of the room.
    View location | Show on map
  • Image of Drug Testing Lab - Laboratory B1

    Drug Testing Lab - Laboratory B1

    Leon [2nd] (Hardcore)
    On the floor next to the dead body in the protective suit in the north west corner of the room.
    View location | Show on map
  • Image of Drug Testing Lab - Laboratory B1

    Drug Testing Lab - Laboratory B1

    Claire [2nd] (Hardcore)
    On the floor next to the dead body in the protective suit in the north west corner of the room.
    View location | Show on map
  • Image of Biotesting Lab - Laboratory B1

    Biotesting Lab - Laboratory B1

    Leon (Standard)
    On the floor next to the dead body of the U.S.S. soldier in the east passageway, near the door from the Main Shaft.
    View location | Show on map
  • Image of Biotesting Lab - Laboratory B1

    Biotesting Lab - Laboratory B1

    Claire (Standard)
    On the floor next to the dead body of the U.S.S. soldier in the east passageway, near the door from the Main Shaft.
    View location | Show on map
  • Image of Biotesting Lab - Laboratory B1

    Biotesting Lab - Laboratory B1

    Leon [2nd] (Standard)
    On the floor next to the dead body of the U.S.S. soldier in the east passageway, near the door from the Main Shaft.
    View location | Show on map
  • Image of Biotesting Lab - Laboratory B1

    Biotesting Lab - Laboratory B1

    Claire [2nd] (Standard)
    On the floor next to the dead body of the U.S.S. soldier in the east passageway, near the door from the Main Shaft.
    View location | Show on map
  • Image of Biotesting Lab - Laboratory B1

    Biotesting Lab - Laboratory B1

    Leon (Hardcore)
    On the floor next to the dead body of the U.S.S. soldier in the east passageway, near the door from the Main Shaft.
    View location | Show on map
  • Image of Biotesting Lab - Laboratory B1

    Biotesting Lab - Laboratory B1

    Claire (Hardcore)
    On the floor next to the dead body of the U.S.S. soldier in the east passageway, near the door from the Main Shaft.
    View location | Show on map
  • Image of Biotesting Lab - Laboratory B1

    Biotesting Lab - Laboratory B1

    Leon [2nd] (Hardcore)
    On the floor next to the dead body of the U.S.S. soldier in the east passageway, near the door from the Main Shaft.
    View location | Show on map
  • Image of Biotesting Lab - Laboratory B1

    Biotesting Lab - Laboratory B1

    Claire [2nd] (Hardcore)
    On the floor next to the dead body of the U.S.S. soldier in the east passageway, near the door from the Main Shaft.
    View location | Show on map
  • Image of Bioreactors Room - Laboratory B2 (West)

    Bioreactors Room - Laboratory B2 (West)

    Leon (Standard)
    On the small ledge next to the east-side luminous green canisters on the south side of the room.
    View location | Show on map
  • Image of Bioreactors Room - Laboratory B2 (West)

    Bioreactors Room - Laboratory B2 (West)

    Claire (Standard)
    On the small ledge next to the east-side luminous green canisters on the south side of the room.
    View location | Show on map
  • Image of Bioreactors Room - Laboratory B2 (West)

    Bioreactors Room - Laboratory B2 (West)

    Leon [2nd] (Standard)
    On the small ledge next to the east-side luminous green canisters on the south side of the room.
    View location | Show on map
  • Image of Bioreactors Room - Laboratory B2 (West)

    Bioreactors Room - Laboratory B2 (West)

    Claire [2nd] (Standard)
    On the small ledge next to the east-side luminous green canisters on the south side of the room.
    View location | Show on map
  • Image of Bioreactors Room - Laboratory B2 (West)

    Bioreactors Room - Laboratory B2 (West)

    Leon (Hardcore)
    On the small ledge next to the east-side luminous green canisters on the south side of the room.
    View location | Show on map
  • Image of Bioreactors Room - Laboratory B2 (West)

    Bioreactors Room - Laboratory B2 (West)

    Claire (Hardcore)
    On the small ledge next to the east-side luminous green canisters on the south side of the room.
    View location | Show on map
  • Image of Bioreactors Room - Laboratory B2 (West)

    Bioreactors Room - Laboratory B2 (West)

    Leon [2nd] (Hardcore)
    On the small ledge next to the east-side luminous green canisters on the south side of the room.
    View location | Show on map
  • Image of Bioreactors Room - Laboratory B2 (West)

    Bioreactors Room - Laboratory B2 (West)

    Claire [2nd] (Hardcore)
    On the small ledge next to the east-side luminous green canisters on the south side of the room.
    View location | Show on map

Related product

Resident Evil 2 Board Game

Resident Evil 2 Board Game

Buy the Resident Evil 2 Board Game on Amazon

Explore further