Evil Resource

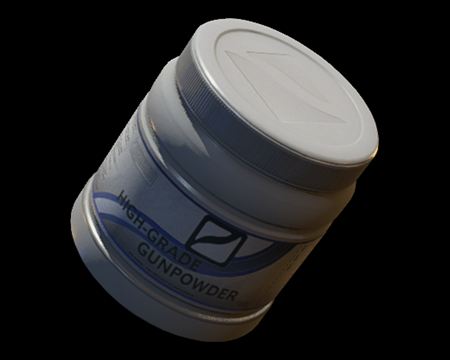
High-Grade Gunpowder (White) (Resident Evil 2 Remake)

Image of High-Grade Gunpowder (White)

Combine with gunpowder to make acid rounds, or combine 2 of these to make submachine gun ammo.

A small plastic container of a variety of high-grade gunpowder. It can be used to create ammunition. This type of gunpowder is exclusive to Claire.

Use this with the following items to produce the respective results:
CategoryWeaponry (Resource)

Related product

Resident Evil Nemesis Statue

Resident Evil Nemesis Statue

Buy the Resident Evil Nemesis 12-inch Statue on Amazon

Statistics

Game modeSum total
Claire (Standard)13
Claire [2nd] (Standard)14
Claire (Hardcore)10
Claire [2nd] (Hardcore)11

Location

  • Image of Break Room - Police Station 1F

    Break Room - Police Station 1F

    Claire [2nd] (Standard)
    Inside the left locker separating the room.
    View location | Show on map
  • Image of Break Room - Police Station 1F

    Break Room - Police Station 1F

    Claire [2nd] (Hardcore)
    Inside the left locker separating the room.
    View location | Show on map
  • Image of East Office - Police Station 1F

    East Office - Police Station 1F

    Claire (Standard)
    On the wooden cabinet at the back of the small south west office.
    View location | Show on map
  • Image of East Office - Police Station 1F

    East Office - Police Station 1F

    Claire [2nd] (Standard)
    On the wooden cabinet at the back of the small south west office.
    View location | Show on map
  • Image of East Office - Police Station 1F

    East Office - Police Station 1F

    Claire (Hardcore)
    On the wooden cabinet at the back of the small south west office.
    View location | Show on map
  • Image of East Office - Police Station 1F

    East Office - Police Station 1F

    Claire [2nd] (Hardcore)
    On the wooden cabinet at the back of the small south west office.
    View location | Show on map
  • Image of S.T.A.R.S. Office - Police Station 2F

    S.T.A.R.S. Office - Police Station 2F

    Claire (Standard)
    On the desk in the south east corner of the room.
    View location | Show on map
  • Image of S.T.A.R.S. Office - Police Station 2F

    S.T.A.R.S. Office - Police Station 2F

    Claire [2nd] (Standard)
    On the desk in the south east corner of the room.
    View location | Show on map
  • Image of S.T.A.R.S. Office - Police Station 2F

    S.T.A.R.S. Office - Police Station 2F

    Claire (Hardcore)
    On the desk in the south east corner of the room.
    View location | Show on map
  • Image of S.T.A.R.S. Office - Police Station 2F

    S.T.A.R.S. Office - Police Station 2F

    Claire [2nd] (Hardcore)
    On the desk in the south east corner of the room.
    View location | Show on map
  • Image of Kennel - Police Station B1

    Kennel - Police Station B1

    Claire (Standard)
    Inside the stack of baskets next to the south west door.
    View location | Show on map
  • Image of Kennel - Police Station B1

    Kennel - Police Station B1

    Claire [2nd] (Standard)
    Inside the stack of baskets next to the south west door.
    View location | Show on map
  • Image of Kennel - Police Station B1

    Kennel - Police Station B1

    Claire (Hardcore)
    Inside the stack of baskets next to the south west door.
    View location | Show on map
  • Image of Kennel - Police Station B1

    Kennel - Police Station B1

    Claire [2nd] (Hardcore)
    Inside the stack of baskets next to the south west door.
    View location | Show on map
  • Image of Elevator Controls Room - Police Station B1

    Elevator Controls Room - Police Station B1

    Claire (Standard)
    On the cardboard box in the south west corner of the room.
    View location | Show on map
  • Image of Elevator Controls Room - Police Station B1

    Elevator Controls Room - Police Station B1

    Claire [2nd] (Standard)
    On the cardboard box in the south west corner of the room.
    View location | Show on map
  • Image of Elevator Controls Room - Police Station B1

    Elevator Controls Room - Police Station B1

    Claire (Hardcore)
    On the cardboard box in the south west corner of the room.
    View location | Show on map
  • Image of Elevator Controls Room - Police Station B1

    Elevator Controls Room - Police Station B1

    Claire [2nd] (Hardcore)
    On the cardboard box in the south west corner of the room.
    View location | Show on map
  • Image of Private Collection Room - Police Station 2F

    Private Collection Room - Police Station 2F

    Claire (Standard)
    On the wooden display cabinet opposite the entrance door.
    View location | Show on map
  • Image of Private Collection Room - Police Station 2F

    Private Collection Room - Police Station 2F

    Claire [2nd] (Standard)
    On the wooden display cabinet opposite the entrance door.
    View location | Show on map
  • Image of East Stairway 1F - Police Station 1F

    East Stairway 1F - Police Station 1F

    Claire (Standard)
    Inside the locker in the south west corner of the passage.
    View location | Show on map
  • Image of East Stairway 1F - Police Station 1F

    East Stairway 1F - Police Station 1F

    Claire [2nd] (Standard)
    Inside the locker in the south west corner of the passage.
    View location | Show on map
  • Image of East Stairway 1F - Police Station 1F

    East Stairway 1F - Police Station 1F

    Claire (Hardcore)
    Inside the locker in the south west corner of the passage.
    View location | Show on map
  • Image of East Stairway 1F - Police Station 1F

    East Stairway 1F - Police Station 1F

    Claire [2nd] (Hardcore)
    Inside the locker in the south west corner of the passage.
    View location | Show on map
  • Image of Lower Waterway - Sewers Lower

    Lower Waterway - Sewers Lower

    Claire (Standard)
    On a pile of waste in the western area of the passage.
    View location | Show on map
  • Image of Lower Waterway - Sewers Lower

    Lower Waterway - Sewers Lower

    Claire [2nd] (Standard)
    On a pile of waste in the western area of the passage.
    View location | Show on map
  • Image of Lower Waterway - Sewers Lower

    Lower Waterway - Sewers Lower

    Claire (Hardcore)
    On a pile of waste in the western area of the passage.
    View location | Show on map
  • Image of Lower Waterway - Sewers Lower

    Lower Waterway - Sewers Lower

    Claire [2nd] (Hardcore)
    On a pile of waste in the western area of the passage.
    View location | Show on map
  • Image of Water Injection Chamber - Sewers Upper

    Water Injection Chamber - Sewers Upper

    Claire (Standard)
    On the bench in the north east corner of the room.
    View location | Show on map
  • Image of Water Injection Chamber - Sewers Upper

    Water Injection Chamber - Sewers Upper

    Claire [2nd] (Standard)
    On the bench in the north east corner of the room.
    View location | Show on map
  • Image of Specimen Room - Laboratory B1

    Specimen Room - Laboratory B1

    Claire (Standard)
    On a small equipment trolley in the middle of the room.
    View location | Show on map
  • Image of Specimen Room - Laboratory B1

    Specimen Room - Laboratory B1

    Claire [2nd] (Standard)
    On a small equipment trolley in the middle of the room.
    View location | Show on map
  • Image of Specimen Room - Laboratory B1

    Specimen Room - Laboratory B1

    Claire (Hardcore)
    On a small equipment trolley in the middle of the room.
    View location | Show on map
  • Image of Specimen Room - Laboratory B1

    Specimen Room - Laboratory B1

    Claire [2nd] (Hardcore)
    On a small equipment trolley in the middle of the room.
    View location | Show on map
  • Image of Store Room - Laboratory B1

    Store Room - Laboratory B1

    Claire (Standard)
    On the box in the storage area next to the stairway door.
    View location | Show on map
  • Image of Store Room - Laboratory B1

    Store Room - Laboratory B1

    Claire [2nd] (Standard)
    On the box in the storage area next to the stairway door.
    View location | Show on map
  • Image of Store Room - Laboratory B1

    Store Room - Laboratory B1

    Claire (Hardcore)
    On the box in the storage area next to the stairway door.
    View location | Show on map
  • Image of Store Room - Laboratory B1

    Store Room - Laboratory B1

    Claire [2nd] (Hardcore)
    On the box in the storage area next to the stairway door.
    View location | Show on map
  • Image of Server Room - Laboratory B2 (East)

    Server Room - Laboratory B2 (East)

    Claire (Standard)
    On a small trolley in the south west corner of the room.
    View location | Show on map
  • Image of Server Room - Laboratory B2 (East)

    Server Room - Laboratory B2 (East)

    Claire [2nd] (Standard)
    On a small trolley in the south west corner of the room.
    View location | Show on map
  • Image of Server Room - Laboratory B2 (East)

    Server Room - Laboratory B2 (East)

    Claire (Hardcore)
    On a small trolley in the south west corner of the room.
    View location | Show on map
  • Image of Server Room - Laboratory B2 (East)

    Server Room - Laboratory B2 (East)

    Claire [2nd] (Hardcore)
    On a small trolley in the south west corner of the room.
    View location | Show on map
  • Image of Lab Changing Room - Laboratory B1

    Lab Changing Room - Laboratory B1

    Claire (Standard)
    On the bench in the north west corner of the room.
    View location | Show on map
  • Image of Lab Changing Room - Laboratory B1

    Lab Changing Room - Laboratory B1

    Claire [2nd] (Standard)
    On the bench in the north west corner of the room.
    View location | Show on map
  • Image of P-4 Level Testing Lab - Laboratory B1

    P-4 Level Testing Lab - Laboratory B1

    Claire (Standard)
    On the desk in the north west corner of the northern room.
    View location | Show on map
  • Image of P-4 Level Testing Lab - Laboratory B1

    P-4 Level Testing Lab - Laboratory B1

    Claire [2nd] (Standard)
    On the desk in the north west corner of the northern room.
    View location | Show on map
  • Image of P-4 Level Testing Lab - Laboratory B1

    P-4 Level Testing Lab - Laboratory B1

    Claire (Hardcore)
    On the desk in the north west corner of the northern room.
    View location | Show on map
  • Image of P-4 Level Testing Lab - Laboratory B1

    P-4 Level Testing Lab - Laboratory B1

    Claire [2nd] (Hardcore)
    On the desk in the north west corner of the northern room.
    View location | Show on map

There are no locations to show for this game mode. The following game modes are applicable:

Related product

Resident Evil Book 3 - City of the Dead

Resident Evil Book 3 - City of the Dead

Buy the Resident Evil Book 3 - City of the Dead by S.D. Perry on Amazon

Explore further