Evil Resource

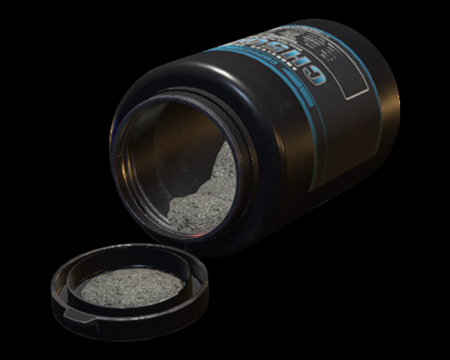
Gunpowder (Resident Evil 2 Remake)

Image of Gunpowder

Standard-grade gunpowder. Combine 2 of these to create handgun ammo.

A small plastic container of a variety of gunpowder. It can be used to create ammunition.

Use this with the following items to produce the respective results:
CategoryWeaponry (Resource)

Related product

Numskull Resident Evil Umbrella Corp Lamp Wall Light

Numskull Resident Evil Umbrella Corp Lamp Wall Light

Buy the Numskull Resident Evil Umbrella Corp Lamp Wall Light on Amazon

Statistics

Game modeSum total
Leon (Standard)17
Claire (Standard)15
Leon [2nd] (Standard)16
Claire [2nd] (Standard)14
Leon (Hardcore)14
Claire (Hardcore)13
Leon [2nd] (Hardcore)13
Claire [2nd] (Hardcore)12

Location

  • Image of West Office - Police Station 1F

    West Office - Police Station 1F

    Leon (Standard)
    On the small table near the western door.
    View location | Show on map
  • Image of West Office - Police Station 1F

    West Office - Police Station 1F

    Claire (Standard)
    On the small table near the western door.
    View location | Show on map
  • Image of West Office - Police Station 1F

    West Office - Police Station 1F

    Leon [2nd] (Standard)
    On the small table near the western door.
    View location | Show on map
  • Image of West Office - Police Station 1F

    West Office - Police Station 1F

    Claire [2nd] (Standard)
    On the small table near the western door.
    View location | Show on map
  • Image of West Office - Police Station 1F

    West Office - Police Station 1F

    Leon (Hardcore)
    On the small table near the western door.
    View location | Show on map
  • Image of West Office - Police Station 1F

    West Office - Police Station 1F

    Claire (Hardcore)
    On the small table near the western door.
    View location | Show on map
  • Image of West Office - Police Station 1F

    West Office - Police Station 1F

    Leon [2nd] (Hardcore)
    On the small table near the western door.
    View location | Show on map
  • Image of West Office - Police Station 1F

    West Office - Police Station 1F

    Claire [2nd] (Hardcore)
    On the small table near the western door.
    View location | Show on map
  • Image of Darkroom - Police Station 1F

    Darkroom - Police Station 1F

    Leon (Standard)
    Inside the left locker in the north west corner of the room.
    View location | Show on map
  • Image of Darkroom - Police Station 1F

    Darkroom - Police Station 1F

    Claire (Standard)
    Inside the left locker in the north west corner of the room.
    View location | Show on map
  • Image of Darkroom - Police Station 1F

    Darkroom - Police Station 1F

    Leon [2nd] (Standard)
    Inside the left locker in the north west corner of the room.
    View location | Show on map
  • Image of Darkroom - Police Station 1F

    Darkroom - Police Station 1F

    Claire [2nd] (Standard)
    Inside the left locker in the north west corner of the room.
    View location | Show on map
  • Image of Darkroom - Police Station 1F

    Darkroom - Police Station 1F

    Leon (Hardcore)
    Inside the left locker in the north west corner of the room.
    View location | Show on map
  • Image of Darkroom - Police Station 1F

    Darkroom - Police Station 1F

    Claire (Hardcore)
    Inside the left locker in the north west corner of the room.
    View location | Show on map
  • Image of Darkroom - Police Station 1F

    Darkroom - Police Station 1F

    Leon [2nd] (Hardcore)
    Inside the left locker in the north west corner of the room.
    View location | Show on map
  • Image of Darkroom - Police Station 1F

    Darkroom - Police Station 1F

    Claire [2nd] (Hardcore)
    Inside the left locker in the north west corner of the room.
    View location | Show on map
  • Image of West Storage Room - Police Station 3F

    West Storage Room - Police Station 3F

    Leon (Standard)
    On a short wooden cabinet in the north west area of the room.
    View location | Show on map
  • Image of West Storage Room - Police Station 3F

    West Storage Room - Police Station 3F

    Claire (Standard)
    On a short wooden cabinet in the north west area of the room.
    View location | Show on map
  • Image of West Storage Room - Police Station 3F

    West Storage Room - Police Station 3F

    Leon [2nd] (Standard)
    On a short wooden cabinet in the north west area of the room.
    View location | Show on map
  • Image of West Storage Room - Police Station 3F

    West Storage Room - Police Station 3F

    Claire [2nd] (Standard)
    On a short wooden cabinet in the north west area of the room.
    View location | Show on map
  • Image of West Storage Room - Police Station 3F

    West Storage Room - Police Station 3F

    Leon (Hardcore)
    On a short wooden cabinet in the north west area of the room.
    View location | Show on map
  • Image of West Storage Room - Police Station 3F

    West Storage Room - Police Station 3F

    Claire (Hardcore)
    On a short wooden cabinet in the north west area of the room.
    View location | Show on map
  • Image of West Storage Room - Police Station 3F

    West Storage Room - Police Station 3F

    Leon [2nd] (Hardcore)
    On a short wooden cabinet in the north west area of the room.
    View location | Show on map
  • Image of West Storage Room - Police Station 3F

    West Storage Room - Police Station 3F

    Claire [2nd] (Hardcore)
    On a short wooden cabinet in the north west area of the room.
    View location | Show on map
  • Image of Lounge - Police Station 2F

    Lounge - Police Station 2F

    Leon (Standard)
    On the small tables with the flowers on the east wall.
    View location | Show on map
  • Image of Lounge - Police Station 2F

    Lounge - Police Station 2F

    Claire (Standard)
    On the small tables with the flowers on the east wall.
    View location | Show on map
  • Image of Lounge - Police Station 2F

    Lounge - Police Station 2F

    Leon (Hardcore)
    On the small tables with the flowers on the east wall.
    View location | Show on map
  • Image of Lounge - Police Station 2F

    Lounge - Police Station 2F

    Claire (Hardcore)
    On the small tables with the flowers on the east wall.
    View location | Show on map
  • Image of East Office - Police Station 1F

    East Office - Police Station 1F

    Leon (Standard)
    On one of the desks on the north side of the room.
    View location | Show on map
  • Image of East Office - Police Station 1F

    East Office - Police Station 1F

    Claire (Standard)
    On one of the desks on the north side of the room.
    View location | Show on map
  • Image of East Office - Police Station 1F

    East Office - Police Station 1F

    Leon [2nd] (Standard)
    On one of the desks on the north side of the room.
    View location | Show on map
  • Image of East Office - Police Station 1F

    East Office - Police Station 1F

    Claire [2nd] (Standard)
    On one of the desks on the north side of the room.
    View location | Show on map
  • Image of East Office - Police Station 1F

    East Office - Police Station 1F

    Leon (Hardcore)
    On one of the desks on the north side of the room.
    View location | Show on map
  • Image of East Office - Police Station 1F

    East Office - Police Station 1F

    Claire (Hardcore)
    On one of the desks on the north side of the room.
    View location | Show on map
  • Image of East Office - Police Station 1F

    East Office - Police Station 1F

    Leon [2nd] (Hardcore)
    On one of the desks on the north side of the room.
    View location | Show on map
  • Image of East Office - Police Station 1F

    East Office - Police Station 1F

    Claire [2nd] (Hardcore)
    On one of the desks on the north side of the room.
    View location | Show on map
  • Image of Safety Deposit Room - Police Station 1F

    Safety Deposit Room - Police Station 1F

    Leon (Standard)
    Inside the locker labelled "102". You need to use the Spare Key for the "2" on the control panel.
    View location | Show on map
  • Image of Safety Deposit Room - Police Station 1F

    Safety Deposit Room - Police Station 1F

    Claire (Standard)
    Inside the locker labelled "102". You need to use the Spare Key for the "2" on the control panel.
    View location | Show on map
  • Image of Safety Deposit Room - Police Station 1F

    Safety Deposit Room - Police Station 1F

    Leon [2nd] (Standard)
    Inside the locker labelled "102". You need to use the Spare Key for the "2" on the control panel.
    View location | Show on map
  • Image of Safety Deposit Room - Police Station 1F

    Safety Deposit Room - Police Station 1F

    Claire [2nd] (Standard)
    Inside the locker labelled "102". You need to use the Spare Key for the "2" on the control panel.
    View location | Show on map
  • Image of Safety Deposit Room - Police Station 1F

    Safety Deposit Room - Police Station 1F

    Leon (Hardcore)
    Inside the locker labelled "102". You need to use the Spare Key for the "2" on the control panel.
    View location | Show on map
  • Image of Safety Deposit Room - Police Station 1F

    Safety Deposit Room - Police Station 1F

    Claire (Hardcore)
    Inside the locker labelled "102". You need to use the Spare Key for the "2" on the control panel.
    View location | Show on map
  • Image of Safety Deposit Room - Police Station 1F

    Safety Deposit Room - Police Station 1F

    Leon [2nd] (Hardcore)
    Inside the locker labelled "102". You need to use the Spare Key for the "2" on the control panel.
    View location | Show on map
  • Image of Safety Deposit Room - Police Station 1F

    Safety Deposit Room - Police Station 1F

    Claire [2nd] (Hardcore)
    Inside the locker labelled "102". You need to use the Spare Key for the "2" on the control panel.
    View location | Show on map
  • Image of Women's Locker Room - Police Station 2F

    Women's Locker Room - Police Station 2F

    Leon (Standard)
    Inside the left locker in the south east corner of the locker room.
    View location | Show on map
  • Image of Women's Locker Room - Police Station 2F

    Women's Locker Room - Police Station 2F

    Claire (Standard)
    Inside the left locker in the south east corner of the locker room.
    View location | Show on map
  • Image of Women's Locker Room - Police Station 2F

    Women's Locker Room - Police Station 2F

    Leon [2nd] (Standard)
    Inside the left locker in the south east corner of the locker room.
    View location | Show on map
  • Image of Women's Locker Room - Police Station 2F

    Women's Locker Room - Police Station 2F

    Claire [2nd] (Standard)
    Inside the left locker in the south east corner of the locker room.
    View location | Show on map
  • Image of Women's Locker Room - Police Station 2F

    Women's Locker Room - Police Station 2F

    Leon (Hardcore)
    Inside the left locker in the south east corner of the locker room.
    View location | Show on map
  • Image of Women's Locker Room - Police Station 2F

    Women's Locker Room - Police Station 2F

    Claire (Hardcore)
    Inside the left locker in the south east corner of the locker room.
    View location | Show on map
  • Image of Women's Locker Room - Police Station 2F

    Women's Locker Room - Police Station 2F

    Leon [2nd] (Hardcore)
    Inside the left locker in the south east corner of the locker room.
    View location | Show on map
  • Image of Women's Locker Room - Police Station 2F

    Women's Locker Room - Police Station 2F

    Claire [2nd] (Hardcore)
    Inside the left locker in the south east corner of the locker room.
    View location | Show on map
  • Image of Secret Room - Underground Facility Upper

    Secret Room - Underground Facility Upper

    Leon (Standard)
    On the main desk.
    View location | Show on map
  • Image of Secret Room - Underground Facility Upper

    Secret Room - Underground Facility Upper

    Claire (Standard)
    On the main desk.
    View location | Show on map
  • Image of Secret Room - Underground Facility Upper

    Secret Room - Underground Facility Upper

    Leon [2nd] (Standard)
    On the main desk.
    View location | Show on map
  • Image of Secret Room - Underground Facility Upper

    Secret Room - Underground Facility Upper

    Claire [2nd] (Standard)
    On the main desk.
    View location | Show on map
  • Image of Machinery Room 2F - Underground Facility Middle

    Machinery Room 2F - Underground Facility Middle

    Leon (Standard)
    Inside the locker in the staff room.
    View location | Show on map
  • Image of Machinery Room 2F - Underground Facility Middle

    Machinery Room 2F - Underground Facility Middle

    Claire (Standard)
    Inside the locker in the staff room.
    View location | Show on map
  • Image of Machinery Room 2F - Underground Facility Middle

    Machinery Room 2F - Underground Facility Middle

    Leon [2nd] (Standard)
    Inside the locker in the staff room.
    View location | Show on map
  • Image of Machinery Room 2F - Underground Facility Middle

    Machinery Room 2F - Underground Facility Middle

    Claire [2nd] (Standard)
    Inside the locker in the staff room.
    View location | Show on map
  • Image of Machinery Room 2F - Underground Facility Middle

    Machinery Room 2F - Underground Facility Middle

    Leon (Hardcore)
    Inside the locker in the staff room.
    View location | Show on map
  • Image of Machinery Room 2F - Underground Facility Middle

    Machinery Room 2F - Underground Facility Middle

    Claire (Hardcore)
    Inside the locker in the staff room.
    View location | Show on map
  • Image of Machinery Room 2F - Underground Facility Middle

    Machinery Room 2F - Underground Facility Middle

    Leon [2nd] (Hardcore)
    Inside the locker in the staff room.
    View location | Show on map
  • Image of Machinery Room 2F - Underground Facility Middle

    Machinery Room 2F - Underground Facility Middle

    Claire [2nd] (Hardcore)
    Inside the locker in the staff room.
    View location | Show on map
  • Image of Observation Room - Police Station 1F

    Observation Room - Police Station 1F

    Leon (Standard)
    On the body of the dead police officer next to the door.
    View location | Show on map
  • Image of Observation Room - Police Station 1F

    Observation Room - Police Station 1F

    Claire (Standard)
    On the body of the dead police officer next to the door.
    View location | Show on map
  • Image of Observation Room - Police Station 1F

    Observation Room - Police Station 1F

    Leon [2nd] (Standard)
    On the body of the dead police officer next to the door.
    View location | Show on map
  • Image of Observation Room - Police Station 1F

    Observation Room - Police Station 1F

    Claire [2nd] (Standard)
    On the body of the dead police officer next to the door.
    View location | Show on map
  • Image of Observation Room - Police Station 1F

    Observation Room - Police Station 1F

    Leon (Hardcore)
    On the body of the dead police officer next to the door.
    View location | Show on map
  • Image of Observation Room - Police Station 1F

    Observation Room - Police Station 1F

    Claire (Hardcore)
    On the body of the dead police officer next to the door.
    View location | Show on map
  • Image of Observation Room - Police Station 1F

    Observation Room - Police Station 1F

    Leon [2nd] (Hardcore)
    On the body of the dead police officer next to the door.
    View location | Show on map
  • Image of Observation Room - Police Station 1F

    Observation Room - Police Station 1F

    Claire [2nd] (Hardcore)
    On the body of the dead police officer next to the door.
    View location | Show on map
  • Image of Linen Room - Police Station 2F

    Linen Room - Police Station 2F

    Leon (Standard)
    On the towel stand next to the door.
    View location | Show on map
  • Image of Linen Room - Police Station 2F

    Linen Room - Police Station 2F

    Claire (Standard)
    On the towel stand next to the door.
    View location | Show on map
  • Image of Linen Room - Police Station 2F

    Linen Room - Police Station 2F

    Leon [2nd] (Standard)
    On the towel stand next to the door.
    View location | Show on map
  • Image of Linen Room - Police Station 2F

    Linen Room - Police Station 2F

    Claire [2nd] (Standard)
    On the towel stand next to the door.
    View location | Show on map
  • Image of Linen Room - Police Station 2F

    Linen Room - Police Station 2F

    Leon (Hardcore)
    On the towel stand next to the door.
    View location | Show on map
  • Image of Linen Room - Police Station 2F

    Linen Room - Police Station 2F

    Claire (Hardcore)
    On the towel stand next to the door.
    View location | Show on map
  • Image of Linen Room - Police Station 2F

    Linen Room - Police Station 2F

    Leon [2nd] (Hardcore)
    On the towel stand next to the door.
    View location | Show on map
  • Image of Linen Room - Police Station 2F

    Linen Room - Police Station 2F

    Claire [2nd] (Hardcore)
    On the towel stand next to the door.
    View location | Show on map
  • Image of Records Room - Police Station 1F

    Records Room - Police Station 1F

    Leon (Standard)
    On the printer in the south west corner of the room.
    View location | Show on map
  • Image of Records Room - Police Station 1F

    Records Room - Police Station 1F

    Claire (Standard)
    On the printer in the south west corner of the room.
    View location | Show on map
  • Image of Records Room - Police Station 1F

    Records Room - Police Station 1F

    Leon [2nd] (Standard)
    On the printer in the south west corner of the room.
    View location | Show on map
  • Image of Records Room - Police Station 1F

    Records Room - Police Station 1F

    Claire [2nd] (Standard)
    On the printer in the south west corner of the room.
    View location | Show on map
  • Image of Workers' Break Room - Sewers Upper

    Workers' Break Room - Sewers Upper

    Leon (Standard)
    On the table in the middle of the room.
    View location | Show on map
  • Image of Workers' Break Room - Sewers Upper

    Workers' Break Room - Sewers Upper

    Claire (Standard)
    On the table in the middle of the room.
    View location | Show on map
  • Image of Workers' Break Room - Sewers Upper

    Workers' Break Room - Sewers Upper

    Leon [2nd] (Standard)
    On the table in the middle of the room.
    View location | Show on map
  • Image of Workers' Break Room - Sewers Upper

    Workers' Break Room - Sewers Upper

    Claire [2nd] (Standard)
    On the table in the middle of the room.
    View location | Show on map
  • Image of Workers' Break Room - Sewers Upper

    Workers' Break Room - Sewers Upper

    Leon (Hardcore)
    On the table in the middle of the room.
    View location | Show on map
  • Image of Workers' Break Room - Sewers Upper

    Workers' Break Room - Sewers Upper

    Claire (Hardcore)
    On the table in the middle of the room.
    View location | Show on map
  • Image of Workers' Break Room - Sewers Upper

    Workers' Break Room - Sewers Upper

    Leon [2nd] (Hardcore)
    On the table in the middle of the room.
    View location | Show on map
  • Image of Workers' Break Room - Sewers Upper

    Workers' Break Room - Sewers Upper

    Claire [2nd] (Hardcore)
    On the table in the middle of the room.
    View location | Show on map
  • Image of Lobby - Laboratory B1

    Lobby - Laboratory B1

    Leon (Standard)
    On the desk in the north east corner of the room.
    View location | Show on map
  • Image of Lobby - Laboratory B1

    Lobby - Laboratory B1

    Claire (Standard)
    On the desk in the north east corner of the room.
    View location | Show on map
  • Image of Lobby - Laboratory B1

    Lobby - Laboratory B1

    Leon [2nd] (Standard)
    On the desk in the north east corner of the room.
    View location | Show on map
  • Image of Lobby - Laboratory B1

    Lobby - Laboratory B1

    Claire [2nd] (Standard)
    On the desk in the north east corner of the room.
    View location | Show on map
  • Image of Lobby - Laboratory B1

    Lobby - Laboratory B1

    Leon (Hardcore)
    On the desk in the north east corner of the room.
    View location | Show on map
  • Image of Lobby - Laboratory B1

    Lobby - Laboratory B1

    Claire (Hardcore)
    On the desk in the north east corner of the room.
    View location | Show on map
  • Image of Lobby - Laboratory B1

    Lobby - Laboratory B1

    Leon [2nd] (Hardcore)
    On the desk in the north east corner of the room.
    View location | Show on map
  • Image of Lobby - Laboratory B1

    Lobby - Laboratory B1

    Claire [2nd] (Hardcore)
    On the desk in the north east corner of the room.
    View location | Show on map
  • Image of Low-Temp Testing Lab - Laboratory B2 (East)

    Low-Temp Testing Lab - Laboratory B2 (East)

    Leon (Standard)
    On the benches lining the south side of the inner low-temp room.
    View location | Show on map
  • Image of Low-Temp Testing Lab - Laboratory B2 (East)

    Low-Temp Testing Lab - Laboratory B2 (East)

    Claire (Standard)
    On the benches lining the south side of the inner low-temp room.
    View location | Show on map
  • Image of Low-Temp Testing Lab - Laboratory B2 (East)

    Low-Temp Testing Lab - Laboratory B2 (East)

    Leon [2nd] (Standard)
    On the benches lining the south side of the inner low-temp room.
    View location | Show on map
  • Image of Low-Temp Testing Lab - Laboratory B2 (East)

    Low-Temp Testing Lab - Laboratory B2 (East)

    Claire [2nd] (Standard)
    On the benches lining the south side of the inner low-temp room.
    View location | Show on map
  • Image of Low-Temp Testing Lab - Laboratory B2 (East)

    Low-Temp Testing Lab - Laboratory B2 (East)

    Leon (Hardcore)
    On the benches lining the south side of the inner low-temp room.
    View location | Show on map
  • Image of Low-Temp Testing Lab - Laboratory B2 (East)

    Low-Temp Testing Lab - Laboratory B2 (East)

    Claire (Hardcore)
    On the benches lining the south side of the inner low-temp room.
    View location | Show on map
  • Image of Low-Temp Testing Lab - Laboratory B2 (East)

    Low-Temp Testing Lab - Laboratory B2 (East)

    Leon [2nd] (Hardcore)
    On the benches lining the south side of the inner low-temp room.
    View location | Show on map
  • Image of Low-Temp Testing Lab - Laboratory B2 (East)

    Low-Temp Testing Lab - Laboratory B2 (East)

    Claire [2nd] (Hardcore)
    On the benches lining the south side of the inner low-temp room.
    View location | Show on map
  • Image of Generator Room - Police Station B1

    Generator Room - Police Station B1

    Leon (Standard)
    On the metal shelves on the south wall of the room.
    View location | Show on map
  • Image of Generator Room - Police Station B1

    Generator Room - Police Station B1

    Leon [2nd] (Standard)
    On the metal shelves on the south wall of the room.
    View location | Show on map
  • Image of Generator Room - Police Station B1

    Generator Room - Police Station B1

    Leon (Hardcore)
    On the metal shelves on the south wall of the room.
    View location | Show on map
  • Image of Generator Room - Police Station B1

    Generator Room - Police Station B1

    Leon [2nd] (Hardcore)
    On the metal shelves on the south wall of the room.
    View location | Show on map
  • Image of Boiler Room - Police Station 1F

    Boiler Room - Police Station 1F

    Leon (Standard)
    On the small wooden table next to the door in the north west corner of the room.
    View location | Show on map
  • Image of Boiler Room - Police Station 1F

    Boiler Room - Police Station 1F

    Leon [2nd] (Standard)
    On the small wooden table next to the door in the north west corner of the room.
    View location | Show on map

Related product

Resident Evil Book 1 - The Umbrella Conspiracy

Resident Evil Book 1 - The Umbrella Conspiracy

Buy the Resident Evil Book 1 - The Umbrella Conspiracy by S.D. Perry on Amazon

Explore further