Evil Resource

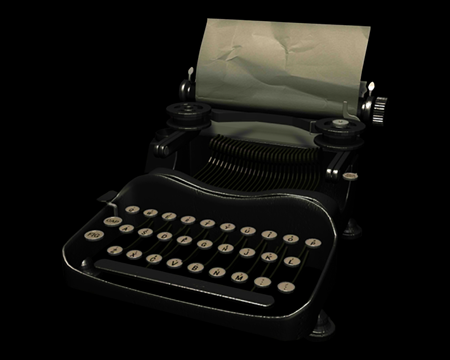
Typewriter (Resident Evil Zero)

Image of Typewriter
A normal typewriter.

Use this to save your progress, provided you have an Ink Ribbon.
CategoryMiscellaneous object

Related product

Numskull Resident Evil Umbrella Corp Lamp Wall Light

Numskull Resident Evil Umbrella Corp Lamp Wall Light

Buy the Numskull Resident Evil Umbrella Corp Lamp Wall Light on Amazon

Location

  • Image of Cabin 201 - Train 1F

    Cabin 201 - Train 1F

    Easy
    On the table in the north east corner of the room.
    View location | Show on map
  • Image of Cabin 201 - Train 1F

    Cabin 201 - Train 1F

    Normal
    On the table in the north east corner of the room.
    View location | Show on map
  • Image of Cabin 201 - Train 1F

    Cabin 201 - Train 1F

    Hard
    On the table in the north east corner of the room.
    View location | Show on map
  • Image of Main Hall - Training Facility 1F

    Main Hall - Training Facility 1F

    Easy
    On a desk next to the foot of the staircase in the north east area of the hall.
    View location | Show on map
  • Image of Main Hall - Training Facility 1F

    Main Hall - Training Facility 1F

    Normal
    On a desk next to the foot of the staircase in the north east area of the hall.
    View location | Show on map
  • Image of Main Hall - Training Facility 1F

    Main Hall - Training Facility 1F

    Hard
    On a desk next to the foot of the staircase in the north east area of the hall.
    View location | Show on map
  • Image of Lecture Room - Training Facility 2F

    Lecture Room - Training Facility 2F

    Easy
    On the table in the north east corner of the room.
    View location | Show on map
  • Image of Lecture Room - Training Facility 2F

    Lecture Room - Training Facility 2F

    Normal
    On the table in the north east corner of the room.
    View location | Show on map
  • Image of Lecture Room - Training Facility 2F

    Lecture Room - Training Facility 2F

    Hard
    On the table in the north east corner of the room.
    View location | Show on map
  • Image of Observation Room - Facility Basement B1

    Observation Room - Facility Basement B1

    Easy
    On the table in the north east corner of the room.
    View location | Show on map
  • Image of Observation Room - Facility Basement B1

    Observation Room - Facility Basement B1

    Normal
    On the table in the north east corner of the room.
    View location | Show on map
  • Image of Observation Room - Facility Basement B1

    Observation Room - Facility Basement B1

    Hard
    On the table in the north east corner of the room.
    View location | Show on map
  • Image of Storage Room - Facility Basement B2

    Storage Room - Facility Basement B2

    Easy
    On a box in the north west corner of the room.
    View location | Show on map
  • Image of Storage Room - Facility Basement B2

    Storage Room - Facility Basement B2

    Normal
    On a box in the north west corner of the room.
    View location | Show on map
  • Image of Storage Room - Facility Basement B2

    Storage Room - Facility Basement B2

    Hard
    On a box in the north west corner of the room.
    View location | Show on map
  • Image of Church Back Room - Laboratory 1F

    Church Back Room - Laboratory 1F

    Easy
    On the desk in the south east corner of the room.
    View location | Show on map
  • Image of Church Back Room - Laboratory 1F

    Church Back Room - Laboratory 1F

    Normal
    On the desk in the south east corner of the room.
    View location | Show on map
  • Image of Church Back Room - Laboratory 1F

    Church Back Room - Laboratory 1F

    Hard
    On the desk in the south east corner of the room.
    View location | Show on map
  • Image of Machine Room 2F - Laboratory B1

    Machine Room 2F - Laboratory B1

    Easy
    On the table in the north west corner of the room.
    View location | Show on map
  • Image of Machine Room 2F - Laboratory B1

    Machine Room 2F - Laboratory B1

    Normal
    On the table in the north west corner of the room.
    View location | Show on map
  • Image of Machine Room 2F - Laboratory B1

    Machine Room 2F - Laboratory B1

    Hard
    On the table in the north west corner of the room.
    View location | Show on map
  • Image of Reference Room - Laboratory B2

    Reference Room - Laboratory B2

    Easy
    On the small desk next to the item transport in the north west corner of the room.
    View location | Show on map
  • Image of Reference Room - Laboratory B2

    Reference Room - Laboratory B2

    Normal
    On the small desk next to the item transport in the north west corner of the room.
    View location | Show on map
  • Image of Reference Room - Laboratory B2

    Reference Room - Laboratory B2

    Hard
    On the small desk next to the item transport in the north west corner of the room.
    View location | Show on map
  • Image of Turntable Control Room - Factory 1F

    Turntable Control Room - Factory 1F

    Easy
    On the desk next to the monitor consoles in the middle of the room.
    View location | Show on map
  • Image of Turntable Control Room - Factory 1F

    Turntable Control Room - Factory 1F

    Normal
    On the desk next to the monitor consoles in the middle of the room.
    View location | Show on map
  • Image of Turntable Control Room - Factory 1F

    Turntable Control Room - Factory 1F

    Hard
    On the desk next to the monitor consoles in the middle of the room.
    View location | Show on map
  • Image of Control Room - Treatment Plant B5

    Control Room - Treatment Plant B5

    Easy
    On the desk inside the control room.
    View location | Show on map
  • Image of Control Room - Treatment Plant B5

    Control Room - Treatment Plant B5

    Normal
    On the desk inside the control room.
    View location | Show on map
  • Image of Control Room - Treatment Plant B5

    Control Room - Treatment Plant B5

    Hard
    On the desk inside the control room.
    View location | Show on map
  • Image of Lodgings - Treatment Plant B6

    Lodgings - Treatment Plant B6

    Easy
    Between the two bunk beds in the south west corner of the room.
    View location | Show on map
  • Image of Lodgings - Treatment Plant B6

    Lodgings - Treatment Plant B6

    Normal
    Between the two bunk beds in the south west corner of the room.
    View location | Show on map
  • Image of Lodgings - Treatment Plant B6

    Lodgings - Treatment Plant B6

    Hard
    Between the two bunk beds in the south west corner of the room.
    View location | Show on map
  • Image of Storage - Treatment Plant B9

    Storage - Treatment Plant B9

    Easy
    On the table next to the door in the north east corner of the room.
    View location | Show on map
  • Image of Storage - Treatment Plant B9

    Storage - Treatment Plant B9

    Normal
    On the table next to the door in the north east corner of the room.
    View location | Show on map
  • Image of Storage - Treatment Plant B9

    Storage - Treatment Plant B9

    Hard
    On the table next to the door in the north east corner of the room.
    View location | Show on map

There are no locations to show for this game mode. The following game modes are applicable:

Related product

Resident Evil 3 Board Game

Resident Evil 3 Board Game

Buy the Resident Evil 3 Board Game on Amazon

Explore further