Evil Resource

Ink Ribbon (Resident Evil Remake)

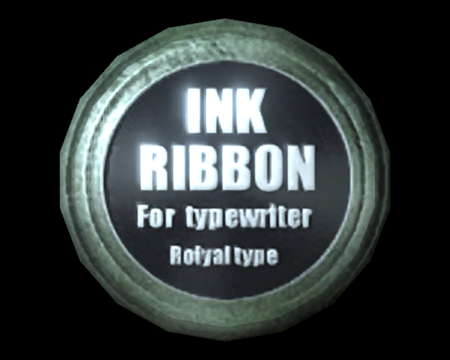
Image of Ink Ribbon

To be used with a typewriter.

A roll of typewriter ribbon.

Use these on a Typewriter in order to save your progress.
CategoryItem (Object, tool or key)

Related product

T-Virus/G-Vaccine Prop Replica Set with Case

T-Virus/G-Vaccine Prop Replica Set with Case

Buy the T-Virus/G-Vaccine Prop Replica Set with Case on Amazon

Statistics

Game modeOccurrencesSum total
Jill (Very Easy)13 75
Chris (Very Easy)13 75
Jill (Easy)13 39
Chris (Easy)13 39
Jill (Normal)10 30
Chris (Normal)10 30
Jill (Hard)8 24
Chris (Hard)8 24

Location

  • Image of Item Box

    Item Box

    Jill (Very Easy)
    Ink Ribbon (×3) - This comes already supplied within the box.
  • Image of Item Box

    Item Box

    Chris (Very Easy)
    Ink Ribbon (×3) - This comes already supplied within the box.
  • Image of Item Box

    Item Box

    Jill (Easy)
    Ink Ribbon (×3) - This comes already supplied within the box.
  • Image of Item Box

    Item Box

    Chris (Easy)
    Ink Ribbon (×3) - This comes already supplied within the box.
  • Image of Item Box

    Item Box

    Jill (Normal)
    Ink Ribbon (×3) - This comes already supplied within the box.
  • Image of Item Box

    Item Box

    Chris (Normal)
    Ink Ribbon (×3) - This comes already supplied within the box.
  • Image of Dining Room - Mansion 1F

    Dining Room - Mansion 1F

    Jill (Very Easy)
    Ink Ribbon (×6) - On the edge of the dining room table, opposite the main entrance.
    View location | Show on map
  • Image of Dining Room - Mansion 1F

    Dining Room - Mansion 1F

    Chris (Very Easy)
    Ink Ribbon (×6) - On the edge of the dining room table, opposite the main entrance.
    View location | Show on map
  • Image of Dining Room - Mansion 1F

    Dining Room - Mansion 1F

    Jill (Easy)
    Ink Ribbon (×3) - On the edge of the dining room table, opposite the main entrance.
    View location | Show on map
  • Image of Dining Room - Mansion 1F

    Dining Room - Mansion 1F

    Chris (Easy)
    Ink Ribbon (×3) - On the edge of the dining room table, opposite the main entrance.
    View location | Show on map
  • Image of Dining Room - Mansion 1F

    Dining Room - Mansion 1F

    Jill (Normal)
    Ink Ribbon (×3) - On the edge of the dining room table, opposite the main entrance.
    View location | Show on map
  • Image of Dining Room - Mansion 1F

    Dining Room - Mansion 1F

    Chris (Normal)
    Ink Ribbon (×3) - On the edge of the dining room table, opposite the main entrance.
    View location | Show on map
  • Image of Dining Room - Mansion 1F

    Dining Room - Mansion 1F

    Jill (Hard)
    Ink Ribbon (×3) - On the edge of the dining room table, opposite the main entrance.
    View location | Show on map
  • Image of Dining Room - Mansion 1F

    Dining Room - Mansion 1F

    Chris (Hard)
    Ink Ribbon (×3) - On the edge of the dining room table, opposite the main entrance.
    View location | Show on map
  • Image of Living Room - Mansion 1F

    Living Room - Mansion 1F

    Jill (Very Easy)
    Ink Ribbon (×6) - On the coffee table in the middle of the room.
    View location | Show on map
  • Image of Living Room - Mansion 1F

    Living Room - Mansion 1F

    Chris (Very Easy)
    Ink Ribbon (×6) - On the coffee table in the middle of the room.
    View location | Show on map
  • Image of Living Room - Mansion 1F

    Living Room - Mansion 1F

    Jill (Easy)
    Ink Ribbon (×3) - On the coffee table in the middle of the room.
    View location | Show on map
  • Image of Living Room - Mansion 1F

    Living Room - Mansion 1F

    Chris (Easy)
    Ink Ribbon (×3) - On the coffee table in the middle of the room.
    View location | Show on map
  • Image of Living Room - Mansion 1F

    Living Room - Mansion 1F

    Jill (Normal)
    Ink Ribbon (×3) - On the coffee table in the middle of the room.
    View location | Show on map
  • Image of Living Room - Mansion 1F

    Living Room - Mansion 1F

    Chris (Normal)
    Ink Ribbon (×3) - On the coffee table in the middle of the room.
    View location | Show on map
  • Image of Small Storeroom - Mansion 1F

    Small Storeroom - Mansion 1F

    Jill (Very Easy)
    Ink Ribbon (×6) - In the draw of the desk opposite the entrance.
    View location | Show on map
  • Image of Small Storeroom - Mansion 1F

    Small Storeroom - Mansion 1F

    Chris (Very Easy)
    Ink Ribbon (×6) - In the draw of the desk opposite the entrance.
    View location | Show on map
  • Image of Small Storeroom - Mansion 1F

    Small Storeroom - Mansion 1F

    Jill (Easy)
    Ink Ribbon (×3) - In the draw of the desk opposite the entrance.
    View location | Show on map
  • Image of Small Storeroom - Mansion 1F

    Small Storeroom - Mansion 1F

    Chris (Easy)
    Ink Ribbon (×3) - In the draw of the desk opposite the entrance.
    View location | Show on map
  • Image of Small Storeroom - Mansion 1F

    Small Storeroom - Mansion 1F

    Jill (Normal)
    Ink Ribbon (×3) - In the draw of the desk opposite the entrance.
    View location | Show on map
  • Image of Small Storeroom - Mansion 1F

    Small Storeroom - Mansion 1F

    Chris (Normal)
    Ink Ribbon (×3) - In the draw of the desk opposite the entrance.
    View location | Show on map
  • Image of Small Storeroom - Mansion 1F

    Small Storeroom - Mansion 1F

    Jill (Hard)
    Ink Ribbon (×3) - In the draw of the desk opposite the entrance.
    View location | Show on map
  • Image of Small Storeroom - Mansion 1F

    Small Storeroom - Mansion 1F

    Chris (Hard)
    Ink Ribbon (×3) - In the draw of the desk opposite the entrance.
    View location | Show on map
  • Image of Bar - Mansion 1F

    Bar - Mansion 1F

    Jill (Very Easy)
    Ink Ribbon (×6) - On the bar.
    View location | Show on map
  • Image of Bar - Mansion 1F

    Bar - Mansion 1F

    Chris (Very Easy)
    Ink Ribbon (×6) - On the bar.
    View location | Show on map
  • Image of Bar - Mansion 1F

    Bar - Mansion 1F

    Jill (Easy)
    Ink Ribbon (×3) - On the bar.
    View location | Show on map
  • Image of Bar - Mansion 1F

    Bar - Mansion 1F

    Chris (Easy)
    Ink Ribbon (×3) - On the bar.
    View location | Show on map
  • Image of Bedroom - Mansion 2F

    Bedroom - Mansion 2F

    Jill (Very Easy)
    Ink Ribbon (×6) - On the desk opposite the foot of the bed.
    View location | Show on map
  • Image of Bedroom - Mansion 2F

    Bedroom - Mansion 2F

    Chris (Very Easy)
    Ink Ribbon (×6) - On the desk opposite the foot of the bed.
    View location | Show on map
  • Image of Bedroom - Mansion 2F

    Bedroom - Mansion 2F

    Jill (Easy)
    Ink Ribbon (×3) - On the desk opposite the foot of the bed.
    View location | Show on map
  • Image of Bedroom - Mansion 2F

    Bedroom - Mansion 2F

    Chris (Easy)
    Ink Ribbon (×3) - On the desk opposite the foot of the bed.
    View location | Show on map
  • Image of Bedroom - Mansion 2F

    Bedroom - Mansion 2F

    Jill (Normal)
    Ink Ribbon (×3) - On the desk opposite the foot of the bed.
    View location | Show on map
  • Image of Bedroom - Mansion 2F

    Bedroom - Mansion 2F

    Chris (Normal)
    Ink Ribbon (×3) - On the desk opposite the foot of the bed.
    View location | Show on map
  • Image of Bedroom - Mansion 2F

    Bedroom - Mansion 2F

    Jill (Hard)
    Ink Ribbon (×3) - On the desk opposite the foot of the bed.
    View location | Show on map
  • Image of Bedroom - Mansion 2F

    Bedroom - Mansion 2F

    Chris (Hard)
    Ink Ribbon (×3) - On the desk opposite the foot of the bed.
    View location | Show on map
  • Image of Residence Storeroom - Residence 1F

    Residence Storeroom - Residence 1F

    Jill (Very Easy)
    Ink Ribbon (×6) - On the shelf next to the table with the typewriter.
    View location | Show on map
  • Image of Residence Storeroom - Residence 1F

    Residence Storeroom - Residence 1F

    Chris (Very Easy)
    Ink Ribbon (×6) - On the shelf next to the table with the typewriter.
    View location | Show on map
  • Image of Residence Storeroom - Residence 1F

    Residence Storeroom - Residence 1F

    Jill (Easy)
    Ink Ribbon (×3) - On the shelf next to the table with the typewriter.
    View location | Show on map
  • Image of Residence Storeroom - Residence 1F

    Residence Storeroom - Residence 1F

    Chris (Easy)
    Ink Ribbon (×3) - On the shelf next to the table with the typewriter.
    View location | Show on map
  • Image of Residence Storeroom - Residence 1F

    Residence Storeroom - Residence 1F

    Jill (Normal)
    Ink Ribbon (×3) - On the shelf next to the table with the typewriter.
    View location | Show on map
  • Image of Residence Storeroom - Residence 1F

    Residence Storeroom - Residence 1F

    Chris (Normal)
    Ink Ribbon (×3) - On the shelf next to the table with the typewriter.
    View location | Show on map
  • Image of Residence Storeroom - Residence 1F

    Residence Storeroom - Residence 1F

    Jill (Hard)
    Ink Ribbon (×3) - On the shelf next to the table with the typewriter.
    View location | Show on map
  • Image of Residence Storeroom - Residence 1F

    Residence Storeroom - Residence 1F

    Chris (Hard)
    Ink Ribbon (×3) - On the shelf next to the table with the typewriter.
    View location | Show on map
  • Image of Room 003 - Residence 1F

    Room 003 - Residence 1F

    Jill (Very Easy)
    Ink Ribbon (×6) - On the small table next to the door.
    View location | Show on map
  • Image of Room 003 - Residence 1F

    Room 003 - Residence 1F

    Chris (Very Easy)
    Ink Ribbon (×6) - On the small table next to the door.
    View location | Show on map
  • Image of Room 003 - Residence 1F

    Room 003 - Residence 1F

    Jill (Easy)
    Ink Ribbon (×3) - On the small table next to the door.
    View location | Show on map
  • Image of Room 003 - Residence 1F

    Room 003 - Residence 1F

    Chris (Easy)
    Ink Ribbon (×3) - On the small table next to the door.
    View location | Show on map
  • Image of Large Art Room - Mansion 1F

    Large Art Room - Mansion 1F

    Jill (Very Easy)
    Ink Ribbon (×6) - In the draw of the desk behind the display bench.
    View location | Show on map
  • Image of Large Art Room - Mansion 1F

    Large Art Room - Mansion 1F

    Chris (Very Easy)
    Ink Ribbon (×6) - In the draw of the desk behind the display bench.
    View location | Show on map
  • Image of Large Art Room - Mansion 1F

    Large Art Room - Mansion 1F

    Jill (Easy)
    Ink Ribbon (×3) - In the draw of the desk behind the display bench.
    View location | Show on map
  • Image of Large Art Room - Mansion 1F

    Large Art Room - Mansion 1F

    Chris (Easy)
    Ink Ribbon (×3) - In the draw of the desk behind the display bench.
    View location | Show on map
  • Image of Large Art Room - Mansion 1F

    Large Art Room - Mansion 1F

    Jill (Normal)
    Ink Ribbon (×3) - In the draw of the desk behind the display bench.
    View location | Show on map
  • Image of Large Art Room - Mansion 1F

    Large Art Room - Mansion 1F

    Chris (Normal)
    Ink Ribbon (×3) - In the draw of the desk behind the display bench.
    View location | Show on map
  • Image of Large Art Room - Mansion 1F

    Large Art Room - Mansion 1F

    Jill (Hard)
    Ink Ribbon (×3) - In the draw of the desk behind the display bench.
    View location | Show on map
  • Image of Large Art Room - Mansion 1F

    Large Art Room - Mansion 1F

    Chris (Hard)
    Ink Ribbon (×3) - In the draw of the desk behind the display bench.
    View location | Show on map
  • Image of Entrance Passage - Courtyard B1

    Entrance Passage - Courtyard B1

    Jill (Very Easy)
    Ink Ribbon (×6) - On the table, next to the typewriter.
    View location | Show on map
  • Image of Entrance Passage - Courtyard B1

    Entrance Passage - Courtyard B1

    Chris (Very Easy)
    Ink Ribbon (×6) - On the table, next to the typewriter.
    View location | Show on map
  • Image of Entrance Passage - Courtyard B1

    Entrance Passage - Courtyard B1

    Jill (Easy)
    Ink Ribbon (×3) - On the table, next to the typewriter.
    View location | Show on map
  • Image of Entrance Passage - Courtyard B1

    Entrance Passage - Courtyard B1

    Chris (Easy)
    Ink Ribbon (×3) - On the table, next to the typewriter.
    View location | Show on map
  • Image of Entrance Passage - Courtyard B1

    Entrance Passage - Courtyard B1

    Jill (Normal)
    Ink Ribbon (×3) - On the table, next to the typewriter.
    View location | Show on map
  • Image of Entrance Passage - Courtyard B1

    Entrance Passage - Courtyard B1

    Chris (Normal)
    Ink Ribbon (×3) - On the table, next to the typewriter.
    View location | Show on map
  • Image of Entrance Passage - Courtyard B1

    Entrance Passage - Courtyard B1

    Jill (Hard)
    Ink Ribbon (×3) - On the table, next to the typewriter.
    View location | Show on map
  • Image of Entrance Passage - Courtyard B1

    Entrance Passage - Courtyard B1

    Chris (Hard)
    Ink Ribbon (×3) - On the table, next to the typewriter.
    View location | Show on map
  • Image of Item Box Room - Laboratory B2

    Item Box Room - Laboratory B2

    Jill (Very Easy)
    Ink Ribbon (×6) - On the floor.
    View location | Show on map
  • Image of Item Box Room - Laboratory B2

    Item Box Room - Laboratory B2

    Chris (Very Easy)
    Ink Ribbon (×6) - On the floor.
    View location | Show on map
  • Image of Item Box Room - Laboratory B2

    Item Box Room - Laboratory B2

    Jill (Easy)
    Ink Ribbon (×3) - On the floor.
    View location | Show on map
  • Image of Item Box Room - Laboratory B2

    Item Box Room - Laboratory B2

    Chris (Easy)
    Ink Ribbon (×3) - On the floor.
    View location | Show on map
  • Image of Item Box Room - Laboratory B2

    Item Box Room - Laboratory B2

    Jill (Normal)
    Ink Ribbon (×3) - On the floor.
    View location | Show on map
  • Image of Item Box Room - Laboratory B2

    Item Box Room - Laboratory B2

    Chris (Normal)
    Ink Ribbon (×3) - On the floor.
    View location | Show on map
  • Image of Item Box Room - Laboratory B2

    Item Box Room - Laboratory B2

    Jill (Hard)
    Ink Ribbon (×3) - On the floor.
    View location | Show on map
  • Image of Item Box Room - Laboratory B2

    Item Box Room - Laboratory B2

    Chris (Hard)
    Ink Ribbon (×3) - On the floor.
    View location | Show on map
  • Image of Laboratory Lounge Room - Laboratory B3

    Laboratory Lounge Room - Laboratory B3

    Jill (Very Easy)
    Ink Ribbon (×6) - On the table, next to the typewriter.
    View location | Show on map
  • Image of Laboratory Lounge Room - Laboratory B3

    Laboratory Lounge Room - Laboratory B3

    Chris (Very Easy)
    Ink Ribbon (×6) - On the table, next to the typewriter.
    View location | Show on map
  • Image of Laboratory Lounge Room - Laboratory B3

    Laboratory Lounge Room - Laboratory B3

    Jill (Easy)
    Ink Ribbon (×3) - On the table, next to the typewriter.
    View location | Show on map
  • Image of Laboratory Lounge Room - Laboratory B3

    Laboratory Lounge Room - Laboratory B3

    Chris (Easy)
    Ink Ribbon (×3) - On the table, next to the typewriter.
    View location | Show on map
  • Image of Laboratory Lounge Room - Laboratory B3

    Laboratory Lounge Room - Laboratory B3

    Jill (Normal)
    Ink Ribbon (×3) - On the table, next to the typewriter.
    View location | Show on map
  • Image of Laboratory Lounge Room - Laboratory B3

    Laboratory Lounge Room - Laboratory B3

    Chris (Normal)
    Ink Ribbon (×3) - On the table, next to the typewriter.
    View location | Show on map
  • Image of Laboratory Lounge Room - Laboratory B3

    Laboratory Lounge Room - Laboratory B3

    Jill (Hard)
    Ink Ribbon (×3) - On the table, next to the typewriter.
    View location | Show on map
  • Image of Laboratory Lounge Room - Laboratory B3

    Laboratory Lounge Room - Laboratory B3

    Chris (Hard)
    Ink Ribbon (×3) - On the table, next to the typewriter.
    View location | Show on map
  • Image of X-Ray Room B - Laboratory B3

    X-Ray Room B - Laboratory B3

    Jill (Very Easy)
    Ink Ribbon (×6) - On a chair next to the door.
    View location | Show on map
  • Image of X-Ray Room B - Laboratory B3

    X-Ray Room B - Laboratory B3

    Chris (Very Easy)
    Ink Ribbon (×6) - On a chair next to the door.
    View location | Show on map
  • Image of X-Ray Room B - Laboratory B3

    X-Ray Room B - Laboratory B3

    Jill (Easy)
    Ink Ribbon (×3) - On a chair next to the door.
    View location | Show on map
  • Image of X-Ray Room B - Laboratory B3

    X-Ray Room B - Laboratory B3

    Chris (Easy)
    Ink Ribbon (×3) - On a chair next to the door.
    View location | Show on map

There are no locations to show for this game mode. The following game modes are applicable:
Related product

Resident Evil Board Game

Resident Evil Board Game

Buy the Resident Evil Board Game on Amazon

Explore further