Evil Resource

Shotgun Shells (Resident Evil 7 Biohazard)

Image of Shotgun Shells

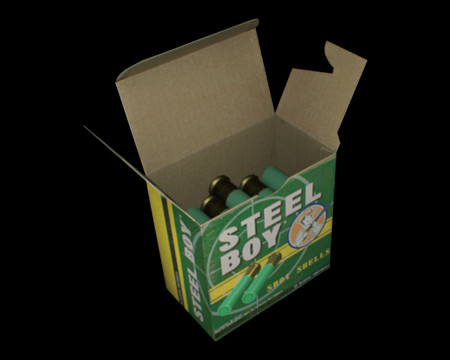
Ammo for the shotgun. Each shell is packed with pellets.

A box of shotgun shells. These rounds can be used with the following weapons:
CategoryWeaponry (Ammunition)

Related product

Welcome to Raccoon City Sign

Welcome to Raccoon City Sign

Buy the Welcome to Raccoon City Sign on Amazon

Statistics

Game modeOccurrencesSum total
Easy28 117
Normal30 121
Madhouse39 110

Location

  • Image of Attic - Guest House 3F

    Attic - Guest House 3F

    Easy
    Shotgun Shells (1×10) - On the floor in the north west corner of the room. Only appears here when you return to this room after exploring the Salt Mine.
    View location | Show on map
  • Image of Attic - Guest House 3F

    Attic - Guest House 3F

    Normal
    Shotgun Shells (1×10) - On the floor in the north west corner of the room. Only appears here when you return to this room after exploring the Salt Mine.
    View location | Show on map
  • Image of Attic - Guest House 3F

    Attic - Guest House 3F

    Madhouse
    Shotgun Shells (1×5) - On the floor in the north west corner of the room. Only appears here when you return to this room after exploring the Salt Mine.
    View location | Show on map
  • Image of Garage - Main House 1F

    Garage - Main House 1F

    Easy
    Shotgun Shells (1×1) - On the cardboard boxes at the end of the metal walkway above the garage. This area becomes accessible via a ladder in front of the workbench once you have defeated Jack.
    View location | Show on map
  • Image of Garage - Main House 1F

    Garage - Main House 1F

    Normal
    Shotgun Shells (1×1) - On the cardboard boxes at the end of the metal walkway above the garage. This area becomes accessible via a ladder in front of the workbench once you have defeated Jack.
    View location | Show on map
  • Image of Balcony - Main House 2F

    Balcony - Main House 2F

    Easy
    Shotgun Shells (1×4) - Inside the locked box on the metal shelves on the west end of the corridor. You need a Lock Pick to open it.
    View location | Show on map
  • Image of Balcony - Main House 2F

    Balcony - Main House 2F

    Normal
    Shotgun Shells (1×4) - Inside the locked box on the metal shelves on the west end of the corridor. You need a Lock Pick to open it.
    View location | Show on map
  • Image of Grandma's Room - Main House 2F

    Grandma's Room - Main House 2F

    Madhouse
    Shotgun Shells (1×1) - On the bedside cabinet.
    View location | Show on map
  • Image of Grandma's Room - Main House 2F

    Grandma's Room - Main House 2F

    Easy
    Shotgun Shells (1×2) - On the bed.
    View location | Show on map
  • Image of Grandma's Room - Main House 2F

    Grandma's Room - Main House 2F

    Normal
    Shotgun Shells (1×2) - On the bed.
    View location | Show on map
  • Image of Drawing Room - Main House 1F

    Drawing Room - Main House 1F

    Easy
    Shotgun Shells (1×2) - Behind the painting leaning against the wall in the south west area of the room.
    View location | Show on map
  • Image of Drawing Room - Main House 1F

    Drawing Room - Main House 1F

    Normal
    Shotgun Shells (1×2) - Behind the painting leaning against the wall in the south west area of the room.
    View location | Show on map
  • Image of Small Workshop - Main House 1F

    Small Workshop - Main House 1F

    Easy
    Shotgun Shells (1×6) - Inside the locked box on the table. You need a Lock Pick to open it.
    View location | Show on map
  • Image of Small Workshop - Main House 1F

    Small Workshop - Main House 1F

    Normal
    Shotgun Shells (1×6) - Inside the locked box on the table. You need a Lock Pick to open it.
    View location | Show on map
  • Image of Back Passageway - Processing Area

    Back Passageway - Processing Area

    Easy
    Shotgun Shells (1×2) - On the small trolley in the northern section of the passage.
    View location | Show on map
  • Image of Back Passageway - Processing Area

    Back Passageway - Processing Area

    Normal
    Shotgun Shells (1×2) - On the small trolley in the northern section of the passage.
    View location | Show on map
  • Image of Meat Storage - Processing Area

    Meat Storage - Processing Area

    Madhouse
    Shotgun Shells (1×2) - On the edge of the table in the middle of the room.
    View location | Show on map
  • Image of Boiler Room - Processing Area

    Boiler Room - Processing Area

    Easy
    Shotgun Shells (1×2) - On the small metal trolley on the south side of the room.
    View location | Show on map
  • Image of Boiler Room - Processing Area

    Boiler Room - Processing Area

    Normal
    Shotgun Shells (1×2) - On the small metal trolley on the south side of the room.
    View location | Show on map
  • Image of Boiler Room - Processing Area

    Boiler Room - Processing Area

    Madhouse
    Shotgun Shells (1×2) - On the edge of the machine in the south west corner of the room.
    View location | Show on map
  • Image of Dissection Room - Processing Area

    Dissection Room - Processing Area

    Easy
    Shotgun Shells (1×5) - Inside the locker in the east half of the room.
    View location | Show on map
  • Image of Dissection Room - Processing Area

    Dissection Room - Processing Area

    Normal
    Shotgun Shells (1×5) - Inside the locker in the east half of the room.
    View location | Show on map
  • Image of Dissection Room - Processing Area

    Dissection Room - Processing Area

    Madhouse
    Shotgun Shells (1×2) - Inside the locker in the east half of the room.
    View location | Show on map
  • Image of Dissection Room Stairs - Processing Area

    Dissection Room Stairs - Processing Area

    Easy
    Shotgun Shells (1×2) - Inside the metal cabinet next to the double doors.
    View location | Show on map
  • Image of Dissection Room Stairs - Processing Area

    Dissection Room Stairs - Processing Area

    Normal
    Shotgun Shells (1×2) - Inside the metal cabinet next to the double doors.
    View location | Show on map
  • Image of Courtyard - Yard

    Courtyard - Yard

    Easy
    Shotgun Shells (1×4) - Underneath the north side of the trailer.
    View location | Show on map
  • Image of Courtyard - Yard

    Courtyard - Yard

    Normal
    Shotgun Shells (1×4) - Underneath the north side of the trailer.
    View location | Show on map
  • Image of Dining Room - Old House 1F

    Dining Room - Old House 1F

    Easy
    Shotgun Shells (1×4) - Inside a wooden box in the area stacked with chairs.
    View location | Show on map
  • Image of Dining Room - Old House 1F

    Dining Room - Old House 1F

    Normal
    Shotgun Shells (1×4) - Inside a wooden box in the area stacked with chairs.
    View location | Show on map
  • Image of Supplies - Main House 1F

    Supplies - Main House 1F

    Easy
    Shotgun Shells (1×3) - On the metal shelves in the north west corner of the room.
    View location | Show on map
  • Image of Supplies - Main House 1F

    Supplies - Main House 1F

    Normal
    Shotgun Shells (1×3) - On the metal shelves in the north west corner of the room.
    View location | Show on map
  • Image of Supplies - Main House 1F

    Supplies - Main House 1F

    Madhouse
    Shotgun Shells (1×3) - On the metal shelves in the north west corner of the room.
    View location | Show on map
  • Image of Guest Room - Old House 1F

    Guest Room - Old House 1F

    Madhouse
    Shotgun Shells (1×1) - On the floor behind the wooden dressing screen in the south west corner of the room.
    View location | Show on map
  • Image of Potting Room - Old House (West) 2F

    Potting Room - Old House (West) 2F

    Madhouse
    Shotgun Shells (1×5) - Inside one of the breakable crates in the south west corner of the room.
    View location | Show on map
  • Image of Old Kitchen - Old House (West) 1F

    Old Kitchen - Old House (West) 1F

    Normal
    Shotgun Shells (1×2) - Inside the draw of the green workbench desk.
    View location | Show on map
  • Image of Old Kitchen - Old House (West) 1F

    Old Kitchen - Old House (West) 1F

    Madhouse
    Shotgun Shells (1×1) - Inside the draw of the green workbench desk.
    View location | Show on map
  • Image of Greenhouse - Old House (West) 1F

    Greenhouse - Old House (West) 1F

    Madhouse
    Shotgun Shells (1×5) - Inside the breakable crate on the metal shelves in the south west corner of the north east quadrant of the greenhouse.
    Shotgun Shells (1×4) - Underneath the air-conditioning fan in the north east corner of the south west quadrant of the greenhouse.
    View location | Show on map
  • Image of Old Upstairs - Old House (West) 2F

    Old Upstairs - Old House (West) 2F

    Madhouse
    Shotgun Shells (1×5) - Inside the breakable crate in the south east corner of the room.
    Shotgun Shells (1×2) - Inside the chest of draws on the south side of the room.
    View location | Show on map
  • Image of Fertilizer Room - Old House (West) 1F

    Fertilizer Room - Old House (West) 1F

    Easy
    Shotgun Shells (1×8) - Inside the metal cabinet in the north east corner of the room.
    View location | Show on map
  • Image of Fertilizer Room - Old House (West) 1F

    Fertilizer Room - Old House (West) 1F

    Normal
    Shotgun Shells (1×8) - Inside the metal cabinet in the north east corner of the room.
    View location | Show on map
  • Image of Fertilizer Room - Old House (West) 1F

    Fertilizer Room - Old House (West) 1F

    Madhouse
    Shotgun Shells (1×4) - Inside the metal cabinet in the north east corner of the room.
    View location | Show on map
  • Image of Old Entrance Hall - Old House (West) 1F

    Old Entrance Hall - Old House (West) 1F

    Normal
    Shotgun Shells (1×2) - Inside the draw of the green workbench.
    View location | Show on map
  • Image of Old Entrance Hall - Old House (West) 1F

    Old Entrance Hall - Old House (West) 1F

    Madhouse
    Shotgun Shells (1×1) - Inside the draw of the green workbench.
    View location | Show on map
  • Image of Kid's Room - Main House 2F

    Kid's Room - Main House 2F

    Easy
    Shotgun Shells (1×3) - Underneath the chest of draws next to the door.
    View location | Show on map
  • Image of Kid's Room - Main House 2F

    Kid's Room - Main House 2F

    Normal
    Shotgun Shells (1×3) - Underneath the chest of draws next to the door.
    Shotgun Shells (1×2) - Inside the small bedside cabinet in the south east corner of the room.
    View location | Show on map
  • Image of Kid's Room - Main House 2F

    Kid's Room - Main House 2F

    Madhouse
    Shotgun Shells (1×2) - Underneath the furniture on the west side of the room.
    Shotgun Shells (1×1) - Inside the small bedside cabinet in the south east corner of the room.
    View location | Show on map
  • Image of Master Bedroom - Main House 2F

    Master Bedroom - Main House 2F

    Easy
    Shotgun Shells (1×2) - Underneath the armchair in the south west corner of the room.
    Shotgun Shells (1×2) - Inside the wardrobe next to the door.
    View location | Show on map
  • Image of Master Bedroom - Main House 2F

    Master Bedroom - Main House 2F

    Normal
    Shotgun Shells (1×2) - Underneath the armchair in the south west corner of the room.
    View location | Show on map
  • Image of Workshop - Processing Area

    Workshop - Processing Area

    Madhouse
    Shotgun Shells (1×2) - Behind the barrels in the north west corner of the room.
    View location | Show on map
  • Image of Supply Room - Testing Area 2F

    Supply Room - Testing Area 2F

    Madhouse
    Shotgun Shells (1×1) - In the north east corner of the room.
    View location | Show on map
  • Image of Fertilizer Room - Testing Area 1F

    Fertilizer Room - Testing Area 1F

    Madhouse
    Shotgun Shells (1×3) - On top of the green workbench.
    View location | Show on map
  • Image of Passcode Room - Testing Area 1F

    Passcode Room - Testing Area 1F

    Madhouse
    Shotgun Shells (1×2) - On the floor underneath the wooden spindle on the south side of the room.
    View location | Show on map
  • Image of Barn - Testing Area 1F

    Barn - Testing Area 1F

    Easy
    Shotgun Shells (1×3) - On the ground amongst the hay bales on the west side of the western half of the room.
    View location | Show on map
  • Image of Barn - Testing Area 1F

    Barn - Testing Area 1F

    Normal
    Shotgun Shells (1×3) - On the ground amongst the hay bales on the west side of the western half of the room.
    View location | Show on map
  • Image of Barn - Testing Area 1F

    Barn - Testing Area 1F

    Madhouse
    Shotgun Shells (1×2) - Inside the breakable crate in the south west corner of the eastern half of the room.
    View location | Show on map
  • Image of Barn Upper Walkway - Testing Area 2F

    Barn Upper Walkway - Testing Area 2F

    Madhouse
    Shotgun Shells (1×3) - On the shelves in the north west corner.
    Shotgun Shells (1×2) - Inside the breakable crate in the south east corner.
    View location | Show on map
  • Image of Platform - Testing Area 2F

    Platform - Testing Area 2F

    Madhouse
    Shotgun Shells (1×2) - Inside the breakable crate in the north east corner.
    View location | Show on map
  • Image of Carcass Room - Testing Area 1F

    Carcass Room - Testing Area 1F

    Easy
    Shotgun Shells (1×2) - Inside the wheelbarrow.
    View location | Show on map
  • Image of Carcass Room - Testing Area 1F

    Carcass Room - Testing Area 1F

    Normal
    Shotgun Shells (1×2) - Inside the wheelbarrow.
    View location | Show on map
  • Image of Office - Testing Area 2F

    Office - Testing Area 2F

    Easy
    Shotgun Shells (1×3) - Inside a bucket on the floor next to the desk.
    View location | Show on map
  • Image of Office - Testing Area 2F

    Office - Testing Area 2F

    Normal
    Shotgun Shells (1×3) - Inside a bucket on the floor next to the desk.
    View location | Show on map
  • Image of Walkway - Boat House 1F

    Walkway - Boat House 1F

    Easy
    Shotgun Shells (1×6) - On the yellow cabinet near the door from the Testing Area's Exit Hallway.
    Shotgun Shells (1×3) - Inside the breakable crate in the north east hut.
    View location | Show on map
  • Image of Walkway - Boat House 1F

    Walkway - Boat House 1F

    Normal
    Shotgun Shells (1×6) - On the yellow cabinet near the door from the Testing Area's Exit Hallway.
    Shotgun Shells (1×3) - Inside the breakable crate in the north east hut.
    Shotgun Shells (1×3) - Inside the breakable crate on the platform containing the second crank mechanism.
    View location | Show on map
  • Image of Shed 1F - Boat House (Storage) 1F

    Shed 1F - Boat House (Storage) 1F

    Easy
    Shotgun Shells (1×10) - On a wooden box next to the stairs.
    View location | Show on map
  • Image of Shed 1F - Boat House (Storage) 1F

    Shed 1F - Boat House (Storage) 1F

    Normal
    Shotgun Shells (1×10) - On a wooden box next to the stairs.
    View location | Show on map
  • Image of Shed 1F - Boat House (Storage) 1F

    Shed 1F - Boat House (Storage) 1F

    Madhouse
    Shotgun Shells (2×3) - Inside the breakable crates in the north east corner of the shed.
    View location | Show on map
  • Image of Storage 1F - Boat House (Storage) 1F

    Storage 1F - Boat House (Storage) 1F

    Madhouse
    Shotgun Shells (1×3) - Inside the breakable crate on the metal shelves in the north west corner.
    View location | Show on map
  • Image of Shed 1F - Boat House (Storage) 1F

    Shed 1F - Boat House (Storage) 1F

    Madhouse
    Shotgun Shells (1×6) - On the plastic chair opposite the stairs.
    View location | Show on map
  • Image of Storage 1F - Boat House (Storage) 1F

    Storage 1F - Boat House (Storage) 1F

    Madhouse
    Shotgun Shells (1×3) - Inside the breakable crate on the metal shelves in the north east corner.
    View location | Show on map
  • Image of Storage 2F - Boat House (Storage) 2F

    Storage 2F - Boat House (Storage) 2F

    Easy
    Shotgun Shells (1×3) - Inside one of the breakable crates in the north west corner.
    View location | Show on map
  • Image of Storage 2F - Boat House (Storage) 2F

    Storage 2F - Boat House (Storage) 2F

    Madhouse
    Shotgun Shells (1×3) - Inside one of the breakable crates in the north west corner.
    View location | Show on map
  • Image of Storage 1F - Boat House (Storage) 1F

    Storage 1F - Boat House (Storage) 1F

    Normal
    Shotgun Shells (1×3) - Inside the breakable crate on the metal shelves in the south west corner.
    Shotgun Shells (1×10) - On the metal shelves in the north west corner.
    View location | Show on map
  • Image of Storage 1F - Boat House (Storage) 1F

    Storage 1F - Boat House (Storage) 1F

    Easy
    Shotgun Shells (1×10) - On the metal shelves in the north west corner.
    View location | Show on map
  • Image of Storage 1F - Boat House (Storage) 1F

    Storage 1F - Boat House (Storage) 1F

    Madhouse
    Shotgun Shells (1×3) - On the metal shelves in the north west corner.
    View location | Show on map
  • Image of Storage 2F - Boat House (Storage) 2F

    Storage 2F - Boat House (Storage) 2F

    Easy
    Shotgun Shells (1×10) - On the metal shelves in the north west corner.
    View location | Show on map
  • Image of Storage 2F - Boat House (Storage) 2F

    Storage 2F - Boat House (Storage) 2F

    Normal
    Shotgun Shells (1×10) - On the metal shelves in the north west corner.
    View location | Show on map
  • Image of Storage 2F - Boat House (Storage) 2F

    Storage 2F - Boat House (Storage) 2F

    Madhouse
    Shotgun Shells (1×3) - On the metal shelves in the north west corner.
    View location | Show on map
  • Image of Cavern - Salt Mine B3

    Cavern - Salt Mine B3

    Madhouse
    Shotgun Shells (1×4) - On the white containers in the north west corner of the cavern.
    View location | Show on map
  • Image of North Cavern - Salt Mine B3

    North Cavern - Salt Mine B3

    Easy
    Shotgun Shells (1×3) - Inside the breakable crate on the southern side of the lower area.
    View location | Show on map
  • Image of Storage Space - Salt Mine B3

    Storage Space - Salt Mine B3

    Madhouse
    Shotgun Shells (1×6) - On the desk opposite the south door.
    View location | Show on map
  • Image of Spiralling Cavern - Salt Mine B1

    Spiralling Cavern - Salt Mine B1

    Madhouse
    Shotgun Shells (2×2) - Inside each of the breakable crates in the eastern fenced area on B1 level.
    Shotgun Shells (1×4) - Inside the cage in the area with the cage on B2 level.
    View location | Show on map
  • Image of Spiralling Cavern - Salt Mine B1

    Spiralling Cavern - Salt Mine B1

    Normal
    Shotgun Shells (1×2) - Inside one of the breakable crates in the eastern fenced area on B1 level.
    View location | Show on map
  • Image of Abandoned Mine - Salt Mine B1

    Abandoned Mine - Salt Mine B1

    Madhouse
    Shotgun Shells (1×2) - Inside the breakable crate next to the central pillar.
    View location | Show on map
  • Image of Abandoned Mine - Salt Mine B1

    Abandoned Mine - Salt Mine B1

    Easy
    Shotgun Shells (1×2) - Inside the breakable crate in the south east corner of the cavern.
    View location | Show on map

There are no locations to show for this game mode. The following game modes are applicable:

Related product

TUBBZ Resident Evil Ada Wong Duck Vinyl Figure

TUBBZ Resident Evil Ada Wong Duck Vinyl Figure

Buy the TUBBZ Resident Evil Ada Wong Duck Vinyl Figure on Amazon

Explore further