Evil Resource

Antique Coin (Resident Evil 7 Biohazard)

Image of Antique Coin

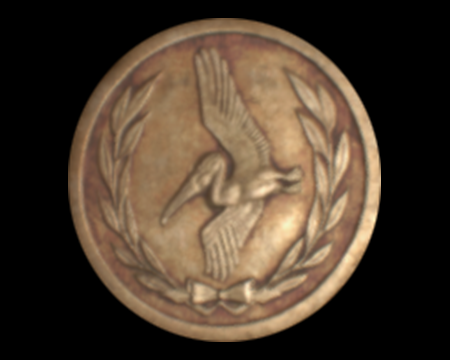
An old, commemorative coin.

A small bronze coin that appears to be very old.

There are quite a number of these scattered throughout the game. Their use becomes apparent once you discover birdcages. These birdcages will contain useful items inside, but they can only be unlocked by providing each with a certain number of these coins.
CategoryItem (Object, tool or key)

Related product

Resident Evil 3 Board Game

Resident Evil 3 Board Game

Buy the Resident Evil 3 Board Game on Amazon

Statistics

Game modeSum total
Easy18
Normal18
Madhouse33

Location

  • Image of Kitchen - Guest House 1F

    Kitchen - Guest House 1F

    Easy
    Inside the draw of the blue cabinet in the south western corner of the room. You need a Lock Pick to open it. Note: the lock pick for this can only be acquired and used during the events of the "Derelict House Footage" video tape.
    View location | Show on map
  • Image of Kitchen - Guest House 1F

    Kitchen - Guest House 1F

    Normal
    Inside the draw of the blue cabinet in the south western corner of the room. You need a Lock Pick to open it. Note: the lock pick for this can only be acquired and used during the events of the "Derelict House Footage" video tape.

    View location | Show on map
  • Image of Kitchen - Guest House 1F

    Kitchen - Guest House 1F

    Madhouse
    Inside the draw of the blue cabinet in the south western corner of the room. You need a Lock Pick to open it. Note: the lock pick for this can only be acquired and used during the events of the "Derelict House Footage" video tape.
    View location | Show on map
  • Image of Living Room - Main House 1F

    Living Room - Main House 1F

    Madhouse
    Inside the small vase on the wooden unit on the east side of the room.
    View location | Show on map
  • Image of Pantry - Main House 1F

    Pantry - Main House 1F

    Easy
    Inside the crawlspace that runs underneath the pantry to the Laundry Room. The coin is located on the lawnmower.
    View location | Show on map
  • Image of Pantry - Main House 1F

    Pantry - Main House 1F

    Normal
    Inside the crawlspace that runs underneath the pantry to the Laundry Room. The coin is located on the lawnmower.
    View location | Show on map
  • Image of Garage - Main House 1F

    Garage - Main House 1F

    Madhouse
    On the metal shelves on the north side of the walkway above the garage. This area becomes accessible via a ladder in front of the workbench once you have defeated Jack.
    View location | Show on map
  • Image of Main Hall - Main House 1F

    Main Hall - Main House 1F

    Easy
    Inside the chest of draws in the north west corner of the room.
    View location | Show on map
  • Image of Main Hall - Main House 1F

    Main Hall - Main House 1F

    Normal
    Inside the chest of draws in the north west corner of the room.
    View location | Show on map
  • Image of Main Hall - Main House 1F

    Main Hall - Main House 1F

    Madhouse
    Inside the chest of draws in the north west corner of the room.
    View location | Show on map
  • Image of Main Corridor - Main House 2F

    Main Corridor - Main House 2F

    Madhouse
    On the floor behind the picture leaning against the wall opposite the dilapidated staircase in the west section of the corridor.
    View location | Show on map
  • Image of Bathroom - Main House 2F

    Bathroom - Main House 2F

    Easy
    Inside the toilet.
    View location | Show on map
  • Image of Bathroom - Main House 2F

    Bathroom - Main House 2F

    Normal
    Inside the toilet.
    View location | Show on map
  • Image of Recreation Room - Main House 2F

    Recreation Room - Main House 2F

    Easy
    On the furniture in the north east corner of the room.
    View location | Show on map
  • Image of Recreation Room - Main House 2F

    Recreation Room - Main House 2F

    Normal
    On the furniture in the north east corner of the room.
    View location | Show on map
  • Image of Recreation Room - Main House 2F

    Recreation Room - Main House 2F

    Madhouse
    Inside the small vase on the bench in the north east corner of the room.
    View location | Show on map
  • Image of Drawing Room - Main House 1F

    Drawing Room - Main House 1F

    Madhouse
    Inside the toilet in the north west corner of the room.
    View location | Show on map
  • Image of Small Workshop - Main House 1F

    Small Workshop - Main House 1F

    Easy
    On the table in the ashtray.
    View location | Show on map
  • Image of Small Workshop - Main House 1F

    Small Workshop - Main House 1F

    Normal
    On the table in the ashtray.
    View location | Show on map
  • Image of Back Passageway - Processing Area

    Back Passageway - Processing Area

    Madhouse
    On the small trolley in the northern section of the passage.
    View location | Show on map
  • Image of Incinerator Room - Processing Area

    Incinerator Room - Processing Area

    Madhouse
    In the yellow dish underneath the stretcher on the west side of the room.
    View location | Show on map
  • Image of Tool Storage - Processing Area

    Tool Storage - Processing Area

    Easy
    Inside the small whole on the southern wall, next to the small wooden pallet.
    View location | Show on map
  • Image of Tool Storage - Processing Area

    Tool Storage - Processing Area

    Normal
    Inside the small whole on the southern wall, next to the small wooden pallet.
    View location | Show on map
  • Image of Dissection Room - Processing Area

    Dissection Room - Processing Area

    Madhouse
    Inside one of the cardboard boxes on the metal shelves separating the room.
    View location | Show on map
  • Image of Courtyard - Yard

    Courtyard - Yard

    Easy
    On top of a stone plant pot in the area behind the eastern porch steps.
    View location | Show on map
  • Image of Courtyard - Yard

    Courtyard - Yard

    Normal
    On top of a stone plant pot in the area behind the eastern porch steps.
    View location | Show on map
  • Image of Courtyard - Yard

    Courtyard - Yard

    Madhouse
    In a hidden area underneath the main house porch, behind a corrogated iron sheet directly between the two sets of porch steps.
    View location | Show on map
  • Image of Trailer - Yard

    Trailer - Yard

    Easy
    On the table in the seating area on the east side of the trailer.
    View location | Show on map
  • Image of Trailer - Yard

    Trailer - Yard

    Normal
    On the table in the seating area on the east side of the trailer.
    View location | Show on map
  • Image of Cellar Stairs - Old House 1F

    Cellar Stairs - Old House 1F

    Easy
    On the white trolley next to the door at the bottom of the stairs.
    View location | Show on map
  • Image of Cellar Stairs - Old House 1F

    Cellar Stairs - Old House 1F

    Normal
    On the white trolley next to the door at the bottom of the stairs.
    View location | Show on map
  • Image of Walkway - Old House 1F

    Walkway - Old House 1F

    Madhouse
    On the floor underneath the house window in the south west corner.
    View location | Show on map
  • Image of Outhouse - Old House 1F

    Outhouse - Old House 1F

    Easy
    On top of the toilet cistern.
    View location | Show on map
  • Image of Outhouse - Old House 1F

    Outhouse - Old House 1F

    Normal
    On top of the toilet cistern.
    View location | Show on map
  • Image of Gallery - Old House 1F

    Gallery - Old House 1F

    Madhouse
    On the low wooden cabinet separating the room, near the shadow plinth.
    View location | Show on map
  • Image of Dilapidated Room - Old House 1F

    Dilapidated Room - Old House 1F

    Madhouse
    On the floor on the west side of the room, next to the exit from the Hidden Passage.
    View location | Show on map
  • Image of Altar - Old House 2F

    Altar - Old House 2F

    Easy
    Inside the small chest of draws in the south west corner of the eastern section of the room.
    View location | Show on map
  • Image of Altar - Old House 2F

    Altar - Old House 2F

    Normal
    Inside the small chest of draws in the south west corner of the eastern section of the room.
    View location | Show on map
  • Image of Altar - Old House 2F

    Altar - Old House 2F

    Madhouse
    Inside the small chest of draws in the south west corner of the eastern section of the room.
    View location | Show on map
  • Image of Supplies - Main House 1F

    Supplies - Main House 1F

    Madhouse
    On the white tarpaulin opposite the door.
    View location | Show on map
  • Image of Old Yard - Old House (West) 1F

    Old Yard - Old House (West) 1F

    Madhouse
    On the electricity box on the pylon near the hole you enter the yard through.
    View location | Show on map
  • Image of Old Entrance Hall - Old House (West) 1F

    Old Entrance Hall - Old House (West) 1F

    Madhouse
    On the green workbench.
    View location | Show on map
  • Image of Attic - Main House Attic

    Attic - Main House Attic

    Madhouse
    On the metal shelves in the south east corner of the room.
    View location | Show on map
  • Image of Entrance - Testing Area 2F

    Entrance - Testing Area 2F

    Madhouse
    On the coffee table, behind the TV.
    View location | Show on map
  • Image of Northern Corridor - Testing Area 2F

    Northern Corridor - Testing Area 2F

    Madhouse
    On the ground next to the metal cage in the south east corner of the 2F of the corridor, near the door from the Supply Room.
    On the floor in the south west corner of the 1F section of the corridor.
    View location | Show on map
  • Image of Fertilizer Room - Testing Area 1F

    Fertilizer Room - Testing Area 1F

    Easy
    Inside the green workbench drawer.
    View location | Show on map
  • Image of Fertilizer Room - Testing Area 1F

    Fertilizer Room - Testing Area 1F

    Normal
    Inside the green workbench drawer.
    View location | Show on map
  • Image of Fertilizer Room - Testing Area 1F

    Fertilizer Room - Testing Area 1F

    Madhouse
    Inside the green workbench drawer.
    View location | Show on map
  • Image of Southern Landing - Testing Area 2F

    Southern Landing - Testing Area 2F

    Easy
    On the shelf in the north east corner of the landing.
    View location | Show on map
  • Image of Southern Landing - Testing Area 2F

    Southern Landing - Testing Area 2F

    Normal
    On the shelf in the north east corner of the landing.
    View location | Show on map
  • Image of Southern Landing - Testing Area 2F

    Southern Landing - Testing Area 2F

    Madhouse
    On the shelf in the north east corner of the landing.
    View location | Show on map
  • Image of Workers Access Passage 2 - Wrecked Ship S2

    Workers Access Passage 2 - Wrecked Ship S2

    Easy
    Inside the wall panel in the north west corner of the passage. You need to use Corrosive to open it.
    View location | Show on map
  • Image of Workers Access Passage 2 - Wrecked Ship S2

    Workers Access Passage 2 - Wrecked Ship S2

    Normal
    Inside the wall panel in the north west corner of the passage. You need to use Corrosive to open it.
    View location | Show on map
  • Image of Workers Access Passage 2 - Wrecked Ship S2

    Workers Access Passage 2 - Wrecked Ship S2

    Madhouse
    Inside the wall panel in the north west corner of the passage. You need to use Corrosive to open it.
    View location | Show on map
  • Image of Office - Wrecked Ship S1

    Office - Wrecked Ship S1

    Easy
    Inside the crawlspace that is accessible through the floor hatch in this room. The coin is located in one of the dead-ends of the crawlspace.
    View location | Show on map
  • Image of Office - Wrecked Ship S1

    Office - Wrecked Ship S1

    Normal
    Inside the crawlspace that is accessible through the floor hatch in this room. The coin is located in one of the dead-ends of the crawlspace.
    View location | Show on map
  • Image of Flooded Room - Wrecked Ship 1F

    Flooded Room - Wrecked Ship 1F

    Easy
    In the water in the middle of the room, near the ladder.
    View location | Show on map
  • Image of Flooded Room - Wrecked Ship 1F

    Flooded Room - Wrecked Ship 1F

    Normal
    In the water in the middle of the room, near the ladder.
    View location | Show on map
  • Image of Laundry Room - Wrecked Ship 1F

    Laundry Room - Wrecked Ship 1F

    Madhouse
    Inside the bottom washing machine in the south west corner.
    View location | Show on map
  • Image of Control Room - Wrecked Ship 3F

    Control Room - Wrecked Ship 3F

    Easy
    Inside the locked orange toolbox on the bench. You need a Lock Pick to open it.
    View location | Show on map
  • Image of Control Room - Wrecked Ship 3F

    Control Room - Wrecked Ship 3F

    Normal
    Inside the locked orange toolbox on the bench. You need a Lock Pick to open it.
    View location | Show on map
  • Image of Side Stairs - Wrecked Ship 4F

    Side Stairs - Wrecked Ship 4F

    Madhouse
    At the bottom of the stairs next to the gas canisters.
    View location | Show on map
  • Image of Break Room - Wrecked Ship 2F

    Break Room - Wrecked Ship 2F

    Madhouse
    Inside the vase that's on the lower shelf of the small trolley in the south west corner of the room.
    View location | Show on map
  • Image of Main Corridor - Wrecked Ship 2F

    Main Corridor - Wrecked Ship 2F

    Madhouse
    On the small semi-circular table in the western section of the corridor.
    View location | Show on map
  • Image of Main Corridor - Wrecked Ship 3F

    Main Corridor - Wrecked Ship 3F

    Madhouse
    On the railing in the north west corner of the corridor.
    View location | Show on map
  • Image of Straight Corridor - Wrecked Ship S2

    Straight Corridor - Wrecked Ship S2

    Madhouse
    On the floor in the north east corner.
    View location | Show on map
  • Image of Pressure Gauge Room - Wrecked Ship S2

    Pressure Gauge Room - Wrecked Ship S2

    Madhouse
    On the workbench in the south east corner of the room.
    View location | Show on map
  • Image of Swamp - Swamp

    Swamp - Swamp

    Madhouse
    On the bank on the northern side of the swamp, on the right shortly after jumping over the large tree trunk blocking your route.
    View location | Show on map

There are no locations to show for this game mode. The following game modes are applicable:

Related product

Numskull Resident Evil Licker Collectible Replica Statue

Numskull Resident Evil Licker Collectible Replica Statue

Buy the Numskull Resident Evil Licker Figure 6.5" 16cm Collectible Replica Statue on Amazon

Explore further